Recent Posts

Installing Britax Car Seats: What You Need to Know


When it comes to ensuring the safety of your little one in the car, installing a Britax car seat is of utmost importance. Did you know that car accidents are one of the leading causes of child fatalities? It’s a startling fact, but fortunately, by following proper installation guidelines, you can significantly reduce the risk. As a parent myself, I understand the importance of securing a Britax car seat correctly.

In this guide, I’ll walk you through the essential steps to ensure your child’s safety on the road.
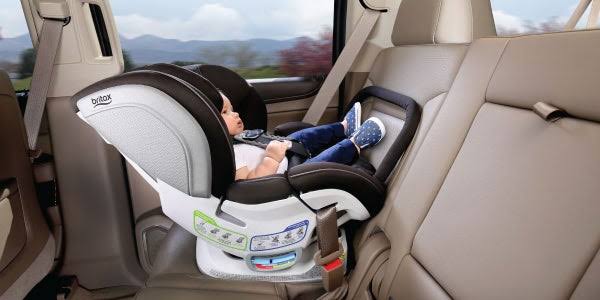
how to install britax car seat

Can I Install a Britax Car Seat in any Vehicle?

Britax car seats are designed to be compatible with a wide range of vehicles. However, it is essential to check the specific requirements and restrictions outlined in the user manual for your Britax car seat model. Some considerations for installation in different vehicles include the available seating positions, available anchor points, and the type of seat belts or latch system in the vehicle.

Remember to always follow the manufacturer’s instructions and guidelines for proper installation in your specific vehicle.

Understanding the Importance of Properly Installing a Britax Car Seat

Installing a car seat is an essential step to ensure the safety of your child while traveling in a vehicle. Proper installation is crucial to prevent injuries in the event of a collision or abrupt stop. Britax car seats are known for their high safety standards and innovative features, making them a popular choice among parents. However, with various models and installation methods available, it’s important to understand how to install a Britax car seat correctly.

To properly install a Britax car seat, it’s important to follow the manufacturer’s instructions and guidelines specific to your model. These instructions provide step-by-step guidance on how to secure the car seat in your vehicle. Additionally, it is recommended to familiarize yourself with your vehicle’s own safety seat installation procedures. Proper installation ensures maximum safety for your child and peace of mind for you as a parent.

Note: Before beginning the installation process, thoroughly read the user manual and familiarize yourself with the specifications and features of your Britax car seat model. This will help you understand the installation requirements and ensure that you are using the car seat correctly.

Now, let’s dive into the different aspects of how to install a Britax car seat effectively.

Installing a Britax Car Seat Using the LATCH System

Installing a Britax Car Seat Using the LATCH System

The LATCH (Lower Anchors and Tethers for Children) system is a standardized method for securing car seats in vehicles, providing a safer alternative to using seat belts alone. Britax car seats are equipped with LATCH connectors designed to attach securely to the vehicle’s LATCH anchor points.

The LATCH system consists of lower anchors located in the vehicle’s seat crease and tether anchors located in the rear seat backrest or vehicle ceiling. Most Britax car seats have two separate lower anchor connectors and a top tether strap or connector, depending on the model.

Here’s a step-by-step guide on how to install a Britax car seat using the LATCH system:

  • 1. Locate the vehicle’s lower anchor points: These can be found in the seat crease, where the vehicle’s seat back and seat cushion meet. They are typically marked with a small symbol depicting a child seat.
  • 2. Position the car seat: Place the car seat in the desired seating position, ensuring it is facing the correct direction according to the manufacturer’s guidelines. The car seat should be reclined at the appropriate angle for your child’s age and weight.
  • 3. Attach the lower anchors: Connect the lower anchor connectors on the car seat to the vehicle’s lower anchors. Ensure that the connectors are inserted into the anchor points completely and securely. You may hear an audible click when they are properly engaged.
  • 4. Tighten the straps: Use the car seat’s built-in LATCH tightening system or adjust the straps manually to remove any excess slack. The car seat should feel secure and not move more than an inch in any direction.
  • 5. Attach the top tether (if applicable): If your Britax car seat model has a top tether, locate the tether anchor point in your vehicle. This is typically located on the rear shelf or the back of the vehicle seat. Connect the top tether strap or connector to the anchor point, making sure it is tightly secured.
  • 6. Perform the shake test: After installing the car seat, grab it near the belt path and give it a firm shake. The car seat should not move more than an inch in any direction. If it feels loose, repeat the installation process and check for any errors or adjustments that need to be made.

Remember to consult both the Britax car seat manual and your vehicle’s user manual for specific instructions and guidelines related to the LATCH system and your particular car seat model.

Installing a Britax Car Seat Using the Seat Belt

If your vehicle is older than 2002 or does not have the LATCH system, you can install your Britax car seat using the seat belt. While the LATCH system is the preferred method due to its ease of use and secure connection, the seat belt installation method can still provide proper safety if done correctly.

Follow these steps to install your Britax car seat using the seat belt:

  • 1. Position the car seat: Similar to the LATCH installation method, place the car seat in the desired seating position, facing the correct direction according to the manufacturer’s guidelines.
  • 2. Thread the seat belt: Pull the vehicle’s seat belt through the appropriate belt path on the car seat. Refer to the user manual to locate the correct belt path for your specific Britax model.
  • 3. Buckle the seat belt: Insert the seat belt latch plate into the buckle and listen for the audible click to ensure it is securely fastened.
  • 4. Lock the seat belt: Depending on your vehicle’s seat belt system, you may need to engage the seat belt’s locking mechanism. This can typically be done by pulling the seat belt tightly until it is fully extended, and then slowly allowing it to retract.
  • 5. Apply firm pressure: Firmly press down on the car seat while pulling the seat belt tight to remove any excess slack. The car seat should feel secure and not move more than an inch in any direction.
  • 6. Perform the shake test: After installation, perform the shake test by grabbing the car seat near the belt path and giving it a firm shake. The car seat should not move more than an inch in any direction. If it feels loose, repeat the installation process and ensure that the seat belt is properly threaded and tightened.

Additional Tips for Ensuring Proper Car Seat Installation

Here are some additional tips to keep in mind to ensure proper car seat installation:

Read the Manuals

Thoroughly read the user manuals for both your Britax car seat and your vehicle. Familiarize yourself with the installation requirements, specifications, and any model-specific instructions to ensure a correct and safe installation.

Check for Recalls

Before installing a used Britax car seat, check for any recalls or safety notices related to the specific model. Visit the official Britax website or online resources provided by regulatory organizations for up-to-date information.

Seek Professional Help if Needed

If you are unsure about the correct installation or have any questions or concerns, consult a certified child passenger safety technician or visit a local child car seat inspection station. These professionals can provide expert guidance and ensure that the car seat is properly installed.

Regularly Check the Installation

Periodically check the installation of your Britax car seat to ensure it remains secure over time. Perform routine checks for any signs of wear or damage to the seat belts, connectors, or other components.

Register your Car Seat

Register your Britax car seat with the manufacturer to receive important safety notifications, recall updates, and other information relevant to your specific model.

Frequently Asked Questions

How do I secure the Britax car seat in my vehicle?

To secure the Britax car seat in your vehicle, start by selecting the appropriate seating position. Next, place the car seat in the desired location and ensure that it is facing the correct direction. Use the seat belt or latch system to secure the car seat in place, following the manufacturer’s instructions. Make sure the seat belt or latch strap is properly tightened and the car seat is securely fastened to the vehicle. Finally, double-check the installation by giving the car seat a firm tug to ensure it doesn’t move more than an inch in any direction.

Keep in mind that the specific installation process may vary depending on the model and type of Britax car seat you have. Always refer to the user manual for detailed instructions and guidelines.

Can I install a Britax car seat using both the seat belt and latch system?

While some car seats allow for installation using both the seat belt and latch system, it is important to follow the manufacturer’s guidelines. Some Britax car seat models may recommend using either the seat belt or latch system, but not both simultaneously. This is to ensure optimal safety and proper installation.

Refer to the user manual for your specific Britax car seat to determine whether using both systems is permissible. If unsure, it is best to contact the manufacturer or a certified car seat technician for guidance.

How do I know if the Britax car seat is properly installed?

To ensure the proper installation of a Britax car seat, check for the following:

  • The car seat is securely fastened and does not move more than an inch in any direction when pulled or pushed.
  • The seat belt or latch strap is properly tightened.
  • The car seat is facing the correct direction based on the age and size of your child.
  • The angle of the car seat is appropriate and within the recommended range.

If you have any doubts about the installation, consult the user manual or seek assistance from a certified car seat technician to ensure the safety of your child during car rides.

When should I transition my child to the next stage car seat?

The right time to transition your child to the next stage car seat depends on their age, weight, and height. Britax car seats typically come with height and weight limits for each stage, such as infant, convertible, and booster seats. Refer to the user manual or consult the manufacturer’s guidelines to determine when it is appropriate to transition your child to the next stage car seat.

It is important to note that your child should remain in a rear-facing car seat until they reach the maximum weight or height limit specified by the manufacturer or local regulations, as rear-facing provides the best protection for infants and young children.

Installing a Britax car seat is an important step in ensuring your child’s safety while traveling in a vehicle. First, make sure to carefully read the car seat’s instruction manual for specific installation details. Next, place the car seat in the desired position, whether rear-facing or forward-facing, and secure it using the vehicle’s seat belt or the built-in LATCH system.

Tighten the seat belt or LATCH straps so that the car seat is securely in place with no excessive movement. Finally, double-check that the car seat is correctly installed by giving it a firm tug to ensure it doesn’t move more than an inch in any direction.

Conclusion

Properly installing a Britax car seat is crucial for the safety and well-being of your child during car journeys. Whether you choose to use the LATCH system or the seat belt installation method, following the manufacturer’s guidelines and instructions is essential. Take the time to read the user manuals, research your specific car seat model, and consult professionals if needed. By prioritizing safety and understanding how to install your Britax car seat correctly, you can have peace of mind knowing that your child is protected on the road.

For more information on car seat installation and safety, you can visit the official Britax website or consult resources provided by reputable organizations such as the National Highway Traffic Safety Administration (NHTSA).

Easiest Way to Convert Graco Car Seats to Boosters


Have you ever wondered how to convert your Graco car seat into a booster seat? Well, I’ve got you covered! Converting your car seat to a booster seat is not only efficient but also cost-effective, saving you the trouble of purchasing a separate booster seat. Let me guide you through the process and make it as seamless as possible.

Converting your Graco car seat to a booster seat is a straightforward process that can be done in just a few simple steps. First, ensure that your car seat meets the weight and height requirements for conversion. Once confirmed, remove the harness system by detaching the straps from the metal anchor points and storing them safely. Next, position the seat belt guide into the appropriate slots and secure it tightly. Finally, adjust the headrest to the desired height and make sure it fits snugly against your child’s back. By following these steps, you can easily transform your Graco car seat into a booster seat, providing your child with the safety and comfort they need as they grow.

how to convert graco car seat to booster

How to Convert Graco Car Seat to Booster

The Graco car seat is a popular choice among parents due to its safety features and durability. However, as your child grows, they will eventually outgrow the car seat and need a booster seat. Luckily, the Graco car seat can be easily converted into a booster seat, extending its usability and saving you money.

Converting a Graco car seat to a booster seat may seem daunting at first, but with the right instructions and a little patience, it can be done successfully. In this article, I will guide you through the process of converting your Graco car seat to a booster seat step by step.

Check the Manual

The first step in converting your Graco car seat to a booster seat is to check the manual that came with your car seat. The manual will provide detailed instructions specifically for your model, ensuring that you follow the correct steps and don’t miss any important details. Each Graco car seat model may have slight variations in the conversion process, so it’s essential to consult the manual for accurate information.

Make sure to read the manual thoroughly and familiarize yourself with the conversion process before you begin. This will help you understand the steps involved and ensure a smooth conversion process. Pay close attention to any warnings or precautions mentioned in the manual to ensure the safety of your child.

Gather the Necessary Tools

Before you start the conversion process, gather all the necessary tools and materials. This will save you time and frustration later on. The tools required for the conversion may vary based on the specific model of your Graco car seat, but here are some common tools you may need:

  • Screwdriver
  • Pliers
  • Replacement parts (if needed)
  • Scissors (for removing fabric)
  • Cleaning supplies (for maintenance)

Having everything you need at hand will make the conversion process more efficient and less stressful.

Prepare the Car Seat

Now that you have familiarized yourself with the manual and gathered the necessary tools, it’s time to prepare the car seat for conversion.

The first step is to remove any extra padding or accessories from the car seat. This may include headrests, infant inserts, or additional cushions. Check the manual for instructions on how to remove these parts safely. Removing the extra padding will allow the car seat to transform into a booster seat more effectively.

Next, remove the fabric cover from the car seat. Follow the instructions in the manual to detach the cover without causing any damage. Once the fabric cover is removed, set it aside for cleaning or storage.

Inspect the car seat for any signs of wear and tear or damage. If you notice any broken parts or components, it’s important to replace them before proceeding with the conversion. Contact Graco or a certified technician if you need assistance in obtaining replacement parts.

Once you have prepared the car seat, you are ready to move on to the next step of the conversion process.

Convert to Booster Seat

Convert to Booster Seat

The precise steps for converting your Graco car seat to a booster seat will depend on the model, so it’s crucial to follow the instructions in the manual. However, here is a general outline of the conversion process:

  • Position the car seat in a forward-facing position.
  • Adjust the headrest and shoulder straps to the appropriate height for your child’s size.
  • Remove the harness straps and set them aside for future use or disposal.
  • Install the vehicle seat belt or the LATCH system, depending on the specific instructions for your model.
  • Ensure that the booster seat is securely attached to the vehicle seat and does not move or wobble.

Again, it’s important to refer to the manual to ensure you follow the correct steps for your specific car seat model. The manual will provide specific instructions and illustrations to guide you through the conversion process smoothly.

What Age and Weight is Suitable for a Graco Booster Seat?

The age and weight recommendations for a Graco booster seat can vary depending on the specific model. However, most Graco booster seats are designed for children who are at least 4 years old and weigh between 40 to 100 pounds. It’s important to consult the instruction manual or guidelines provided by Graco for your specific model to ensure that your child meets the requirements for safe use of the booster seat.

Keep in mind that even if your child meets the minimum age and weight requirements, it’s important to consider their height and developmental readiness. Children should be able to sit in the booster seat with their back against the seatback and their feet flat on the floor for proper support and safety.

Frequently Asked Questions

Can I convert my Graco car seat into a booster seat?

Yes, many Graco car seat models are designed to be convertible into a booster seat. However, it’s important to check the specific instructions and guidelines provided by Graco for your particular model. These instructions will outline the proper conversion process and any necessary steps to ensure the safety and effectiveness of the booster seat.

To convert your Graco car seat to a booster seat, you will typically need to remove the harness system and adjust the seat to the appropriate height and position for use as a booster. Follow the instructions carefully and make sure to double-check that all components are securely in place before using the booster seat.

How do I remove the harness system from my Graco car seat?

The process of removing the harness system from your Graco car seat will vary depending on the specific model.

However, most models will have a release button or lever located on the back of the seat. Press or pull the release mechanism to loosen the harness straps and remove them from the slots on the seat. Make sure to store the harness components in a safe place in case you need to convert the booster seat back to a car seat in the future.

If you’re unsure about the removal process or encountering any difficulties, it’s always best to consult the instruction manual provided by Graco or contact their customer support for assistance.

Can I use my Graco booster seat without the harness?

No, it is not safe to use a Graco booster seat without the harness system. The harness system is designed to secure the child in the seat and provide proper restraint in the event of a collision. Without the harness, the child may not be properly secured and could be at risk of injury.

Always follow the manufacturer’s instructions for the proper use of your Graco booster seat, including the use of the harness system. If the harness straps are damaged or become worn out, contact Graco for replacement parts or consider purchasing a new booster seat.

Are there any additional safety precautions I should take when using a Graco booster seat?

Yes, there are several additional safety precautions to keep in mind when using a Graco booster seat:

– Always ensure that the booster seat is properly installed in your vehicle and securely fastened.

– Make sure the seat belt or harness is snugly and correctly positioned on the child, with the lap belt low and tight across the upper thighs and the shoulder belt crossing the chest and shoulder.

– Regularly check and tighten the seat belt or harness straps, as they may loosen over time.

– Avoid using a booster seat that has been involved in a crash, as it may have structural damage that compromises its safety.

– Always supervise your child when they are using the booster seat, even if they are old enough to buckle themselves in.

To convert a Graco car seat to a booster seat, follow these simple steps. First, remove the harness system by releasing the straps and unbuckling them from the shell. Next, adjust the headrest height to the highest position, ensuring it is securely locked in place.

Then, locate the seat belt path on the back of the booster seat and thread the vehicle’s seat belt through it, making sure it is properly secured. Finally, adjust the seat belt snugly across your child’s lap and shoulder, ensuring it is in the correct position for optimal safety.

Conclusion

Converting a Graco car seat to a booster seat is a simple and straightforward process when you have the right instructions and tools. By following the manual and taking the necessary precautions, you can ensure a safe and successful conversion. Remember to consult the manual specific to your Graco car seat model and follow the instructions carefully.

With a little effort, you can extend the life of your Graco car seat and provide a comfortable and secure booster seat for your growing child.

Step-by-Step Guide to Clean Nuna Pipa Car Seat


Cleaning your Nuna Pipa car seat is essential for maintaining its safety and hygiene. But did you know that regular cleaning can also extend the lifespan of your car seat?

To clean your Nuna Pipa car seat, start by removing the fabric cover and machine washing it on a gentle cycle. Be sure to follow the manufacturer’s instructions for washing and drying. While the cover is being washed, wipe down the hard plastic shell of the car seat with a damp cloth and mild detergent.

Remember to also clean the harness straps and buckle by hand, using warm soapy water and a soft cloth. Once everything is clean and dry, reassemble the car seat, and it’ll be ready for your little one!

how to clean nuna pipa car seat

How to Clean Nuna Pipa Car Seat

The Nuna Pipa car seat is not only comfortable and safe for your baby, but it also needs to be maintained and cleaned regularly to ensure its longevity and hygiene. Keeping your car seat clean is essential for your child’s health and overall well-being. However, many parents are unsure of the proper methods and techniques to clean their Nuna Pipa car seat without causing damage.

In this comprehensive guide, I will walk you through the step-by-step process of cleaning your Nuna Pipa car seat effectively. From removing stains and spills to freshening up the fabric, you’ll learn everything you need to know to keep your car seat in pristine condition. Let’s get started!

But before we dive into the cleaning process, it’s important to note that each Nuna Pipa car seat model may have specific cleaning instructions provided by the manufacturer. It is advisable to refer to the instruction manual that came with your car seat to ensure you are following the correct cleaning guidelines. Now, let’s proceed with the general cleaning steps that apply to most Nuna Pipa car seats.

Step 1: Remove the Car Seat Cover

The first step in cleaning your Nuna Pipa car seat is to remove the car seat cover. Start by releasing the car seat from its base or stroller attachment, depending on your particular model. Once the car seat is detached, locate the hooks or fasteners that secure the cover to the seat and gently unhook or undo them.

Take your time during this step and pay attention to any hidden fasteners or snaps that may be holding the cover in place. Be careful not to force or tug too hard, as this can cause damage to the cover or the seat itself. Once all the fasteners have been released, carefully remove the cover from the car seat.

At this point, it’s a good idea to inspect the cover for any spots or stains that may need extra attention. Note these areas for targeted cleaning later on. If your car seat cover is machine washable, you can proceed to the next step. However, if it is not machine washable, you may need to spot clean or follow alternative cleaning methods mentioned in the instruction manual.

Step 2: Machine Wash the Car Seat Cover

If your Nuna Pipa car seat cover is machine washable, follow these steps to clean it:

  • Check the care tag on the car seat cover for specific washing instructions. Make sure to follow the recommended water temperature and washing settings.
  • Pre-treat any stains or spots on the cover with a mild detergent or stain remover. Gently rub the detergent into the fabric using a soft brush or cloth.
  • Place the car seat cover in the washing machine and add a gentle detergent formulated for baby items. Avoid using harsh chemicals or bleach, as they can damage the fabric.
  • Select a delicate or gentle cycle with a cold water setting. This will help preserve the integrity of the fabric.
  • Once the washing cycle is complete, remove the car seat cover from the machine and inspect it for any lingering stains or spots. If necessary, repeat the washing process or spot clean the remaining stains.
  • Hang the car seat cover to air dry. Avoid using a clothes dryer as the heat can shrink or damage the fabric.

Once the car seat cover is completely dry, you can move on to the next step.

Step 3: Clean the Car Seat Frame and Base

While the car seat cover is being washed and dried, you can focus on cleaning the car seat frame and base. Here’s what you need to do:

  • Using a soft cloth or sponge, dampen it with water and mild detergent. Avoid using harsh chemicals or abrasive cleaners that can damage the surface.
  • Gently wipe down the plastic components of the car seat, including the frame, base, and other non-fabric parts. Pay extra attention to areas that may have accumulated dirt, crumbs, or spills.
  • If there are stubborn stains or sticky residue, you can use a mild soap solution or a mixture of water and vinegar to spot clean. Dampen a cloth with the solution and gently wipe the affected areas.
  • For any crevices or hard-to-reach areas, use a soft-bristled brush or a cotton swab to remove dirt and debris.
  • Once you have cleaned all the plastic components, wipe them dry with a clean cloth to prevent moisture buildup.

Cleaning the Harness and Buckles

The harness and buckles of the Nuna Pipa car seat can accumulate crumbs and dirt over time. Follow these steps to clean them:

  • Remove the harness straps from the car seat by releasing them from the back of the seat.
  • Fill a bowl or basin with warm water and a small amount of mild soap.
  • Place the harness straps in the soapy water and agitate them gently to remove any dirt or grime.
  • Rinse the harness straps thoroughly under clean running water to remove any soap residue.
  • Allow the harness straps to air dry completely before reattaching them to the car seat.
  • For the buckles, use a damp cloth to wipe them clean. Make sure there is no debris or residue stuck in the buckle mechanism.

Tips for Maintaining a Clean Nuna Pipa Car Seat

Now that you have successfully cleaned your Nuna Pipa car seat, it’s important to maintain its cleanliness to ensure the long-lasting quality. Here are a few tips to help you keep your car seat clean and fresh:

  • Regularly spot clean any spills, stains, or messes as soon as they occur. This will prevent them from setting into the fabric and becoming more difficult to remove.
  • Keep a small portable vacuum cleaner or a soft-bristle brush to quickly remove crumbs, dirt, or pet hair from the car seat.
  • Place a removable protective liner or pad on the car seat to prevent direct contact between your child and the seat cover. This can help minimize stains and wear on the cover.
  • Avoid eating or drinking in the car seat to minimize the risk of spills and stains. If necessary, provide snacks or drinks in spill-proof containers.
  • Regularly inspect the car seat for any damage or wear. Replace any worn-out or damaged parts to maintain the safety and integrity of the car seat.

By following these maintenance tips, you can ensure that your Nuna Pipa car seat remains clean, comfortable, and safe for your little one.

Frequently Asked Questions

Can I remove the fabric from my Nuna PIPA car seat for cleaning?

Yes, the fabric on the Nuna PIPA car seat can be removed. To do so, start by removing the car seat from the base, if applicable. Locate the zippers on the fabric cover and carefully unzip them to separate the cover from the seat. Once the cover is removed, follow the manufacturer’s instructions on how to wash and dry it. Make sure to reattach the cover securely before using the car seat again.

It’s important to note that only the fabric cover can be removed for cleaning. The other parts of the car seat, such as the harness and padding, should be spot cleaned according to the manufacturer’s instructions.

What cleaning solutions should I use to clean my Nuna PIPA car seat?

When cleaning your Nuna PIPA car seat, it’s recommended to use mild soap or detergent and warm water. Avoid using harsh chemicals or abrasive cleaners, as they can damage the fabric and other parts of the car seat. Thoroughly rinse off the soap or detergent with clean water and allow the car seat to air dry completely before using it again.

For stubborn stains or odors, you can also try using a fabric cleaner that is safe for use on car seats. Again, make sure to follow the manufacturer’s instructions and test the cleaner on a small, inconspicuous area of the fabric before applying it to the entire seat.

Can I machine wash the straps and harness of my Nuna PIPA car seat?

No, the straps and harness of the Nuna PIPA car seat should not be machine washed. The straps and harness can be spot cleaned using a mild soap or detergent and warm water. Gently wipe the straps and harness with a soft cloth or sponge, being careful not to saturate them. Allow the straps and harness to air dry completely before using the car seat again.

It’s important to regularly inspect the straps and harness for signs of wear or damage. If any part of the straps or harness is frayed, torn, or no longer functioning properly, it’s recommended to contact the manufacturer for replacement parts.

How often should I clean my Nuna PIPA car seat?

The frequency of cleaning your Nuna PIPA car seat will depend on how often it is used and the level of dirt or stains it accumulates. As a general guideline, it’s recommended to clean the car seat cover and other removable fabric parts every few months or as needed. Spot clean any spills or messes as soon as possible to prevent them from setting in.

Remember to always check the manufacturer’s instructions for specific cleaning recommendations and guidelines.

How do I clean the Nuna PIPA car seat base?

To clean the Nuna PIPA car seat base, start by removing the car seat from the base. Use a mild soap or detergent and warm water to wipe down the base, paying attention to any spills, stains, or dirt. Rinse off the soap or detergent with clean water and wipe dry with a clean cloth or towel.

It’s important to avoid submerging the base in water or using any harsh chemicals or abrasive cleaners. Always refer to the manufacturer’s instructions for specific cleaning guidelines and recommendations for the car seat base.

Hey there! So, when it comes to cleaning your Nuna PIPA car seat, follow these simple steps:

1. Start by removing the seat pad and canopy.

2. Gently wipe the plastic frame and base with mild soap and water.

3. For the fabric parts, machine wash in cold water on a delicate cycle.

4. Air dry all the components, and avoid using bleach or harsh chemicals.

5. Finally, reassemble the seat, making sure everything is secure and in its place.

That’s it! Easy, right? Just remember to always check the manufacturer’s instructions for any specific cleaning guidelines. Take care!

Conclusion

In conclusion, keeping your Nuna Pipa car seat clean ensures a safe and comfortable environment for your little one. Regular maintenance, including spot cleaning, machine washing removable parts, and proper drying, not only preserves the seat’s aesthetics but also upholds its functionality.

Following these simple cleaning guidelines contributes to the longevity of your Nuna Pipa car seat, allowing you to provide a clean and secure travel space for your child with ease.

How Much Do Pilots Make? A Proper Guide


As a pilot car driver, I have always been intrigued by the question of how much we can make in this profession. It’s not a typical job, and the earnings might surprise you.

Pilot car drivers play a crucial role in ensuring the safety of oversized loads on the road. We lead the way and communicate with truck drivers to navigate challenging routes. The demand for pilot car drivers has increased over the years, and so have the earnings potential.

A skilled and experienced pilot car driver can make an average of $50,000 to $70,000 per year, depending on factors such as location, company, and the number of trips undertaken. This career can be financially rewarding for those willing to put in the work.

how much does a pilot car driver make

Understanding the Earnings of a Pilot Car Driver

If you’re considering a career as a pilot car driver, one of the questions that may come to mind is how much you can expect to earn in this profession. Pilot car drivers play a crucial role in ensuring the safe transportation of oversized loads on the road. These drivers are responsible for escorting large trucks carrying oversize loads and ensuring that they navigate through traffic and obstacles safely.

When it comes to determining the earnings of a pilot car driver, several factors come into play. These factors include experience, location, and the company you work for. In this article, we will explore the various aspects of a pilot car driver’s salary and provide insights into how much you can expect to make in this profession.

How Much does a Pilot Car Driver Make?

Experience Level

The experience level of a pilot car driver can significantly impact their earnings. Like many professions, pilot car driving often follows a pay scale that increases with experience. As a beginner, you may start at a lower pay rate, but as you gain more experience and expertise, you can negotiate higher wages.

Pilot car drivers with several years of experience and a proven track record may also have the opportunity to charge higher rates or negotiate higher fees for their services. Clients often prefer experienced drivers who can ensure the safe transportation of oversized loads, and they are willing to pay a premium for quality service.

It’s important to note that the experience level of a pilot car driver is not solely based on the number of years they have been in the profession. Factors such as the types of loads they have handled, the challenges they have encountered, and their knowledge of relevant regulations also contribute to their experience level.

Location

The geographic location in which a pilot car driver operates can significantly impact their earnings. Different regions may have varying demand for pilot car services, which can influence the rates drivers can charge. Additionally, the cost of living in a particular area can also affect the earning potential of a pilot car driver.

In areas where there is a high volume of oversized load transports or where safety regulations are particularly strict, the demand for pilot car services may be higher. This increased demand can drive up the rates that drivers can command. Conversely, in areas with lower demand, pilot car drivers may need to adjust their rates accordingly to remain competitive.

Another aspect related to location is the distance and frequency of travel. Some pilot car drivers may operate locally, while others may travel across states or even internationally. The distance and frequency of travel can impact a driver’s earnings, as longer distances and more frequent trips may command higher rates.

Company and Clientele

The company that a pilot car driver works for and their clientele can also play a role in determining their earnings. Larger and more established companies generally have more resources and a broader client base, which can result in higher pay for their drivers.

When working as an independent contractor, a pilot car driver has the freedom to set their rates and negotiate with clients directly. This allows them to potentially earn higher incomes, as they are not limited by a company’s set pay scale. However, independent drivers are also responsible for all expenses related to their equipment, taxes, insurance, and marketing.

On the other hand, working for a company as a salaried employee or on a per-load basis may provide more stability and benefits, such as health insurance and retirement plans. However, the earnings of a pilot car driver working for a company may be subject to the company’s policies and industry standards.

Additional Factors

Aside from experience, location, and the company they work for, there are other factors that can impact a pilot car driver’s earnings. Some of these additional factors include:

  • The seasonality of the job, as demand may fluctuate throughout the year
  • The size and type of loads the driver is responsible for escorting
  • Industry-specific certifications and qualifications
  • Operating costs, such as fuel, vehicle maintenance, and insurance

By considering these additional factors and taking them into account, a pilot car driver can better assess their earning potential and make informed decisions about their career.

How can a Pilot Car Driver Increase their Earning Potential?

To increase their earning potential as a pilot car driver, there are several strategies drivers can consider. Firstly, they can focus on gaining more experience and building a strong reputation in the industry. As their expertise grows, they may be able to negotiate higher pay rates with clients or employers. Secondly, obtaining additional certifications or training can enhance their skills and make them more valuable to potential employers. These qualifications may lead to more lucrative job opportunities. Finally, networking and building relationships with key industry players can also open doors to higher-paying assignments.

In summary, pilot car drivers can increase their earning potential through gaining experience, obtaining additional certifications, and building professional networks.

As a pilot car driver, the amount of money you can make depends on several factors. On average, pilot car drivers earn between $30,000 to $50,000 per year.

The salary can vary based on the region, the demand for pilot car services, and the number of trips you take. Other factors like experience, certifications, and the size of the company you work for can also impact your earnings as a pilot car driver.

how much does a pilot car driver make 2

Frequently Asked Questions

What factors can affect the salary of a pilot car driver?

Several factors can influence the salary of a pilot car driver. Firstly, the location plays a significant role. Different areas may have varying demand for pilot car services, affecting the pay rate. Additionally, the experience and qualifications of the driver can impact their earnings. More experienced drivers may command higher pay rates due to their expertise. Lastly, the length and complexity of the escort jobs can also influence the salary. More challenging assignments may offer higher compensation.

Overall, factors such as location, experience, qualifications, and the nature of the job can all contribute to the salary of a pilot car driver.

Are there any additional perks or benefits for pilot car drivers?

While the specific benefits may vary depending on the company and the driver’s employment arrangement, there are often additional perks for pilot car drivers. Some companies may provide health insurance or retirement plans to their employees. Others may offer paid time off, flexible scheduling, or reimbursements for expenses incurred during work. It’s essential for drivers to inquire about the full package of benefits offered by potential employers to make an informed decision about their compensation.

Overall, pilot car drivers may enjoy additional perks and benefits depending on their employment agreement and the company they work for.

How does the experience level of a pilot car driver affect their earnings?

The experience level of a pilot car driver can have a significant impact on their earnings. Typically, more experienced drivers who have been in the industry for a longer time tend to earn higher salaries. This is because they have acquired a wealth of knowledge and skills that make them valuable assets to companies. Experienced drivers are often sought after for complex or challenging escort jobs due to their ability to handle such situations effectively. As a result, they may receive higher compensation for their expertise and experience.

In summary, the experience level of a pilot car driver can positively influence their earnings as it reflects their skills and expertise in the field.

Are there opportunities for career advancement in the pilot car driving profession?

Yes, there are opportunities for career advancement in the pilot car driving profession. As drivers gain experience and enhance their skills, they may have the chance to take on more significant responsibilities or roles within the industry. Some drivers may pursue additional training or certifications to expand their expertise and increase their earning potential. Others may choose to start their own pilot car businesses or become trainers or mentors for aspiring drivers. With dedication and a proactive approach to professional development, pilot car drivers can explore various avenues for career growth.

In conclusion, the pilot car driving profession offers opportunities for career advancement for those who are willing to continuously improve their skills and seek new challenges.

Conclusion

In conclusion, the compensation for pilot car drivers varies based on factors such as location, experience, and the specific industry they serve. While entry-level earnings may be modest, seasoned pilot car drivers with specialized skills can command higher pay.

It’s essential for aspiring professionals to research regional demand, stay updated on industry standards, and continuously enhance their expertise to maximize earning potential in this vital support role within the transportation sector.

Best Ways to Get Paint off your Car Window


Have you ever had the unfortunate experience of finding paint on your car window? It can be quite a frustrating sight, especially if you’re unsure of how to remove it without causing damage. Fortunately, there are effective methods that can help you get rid of paint from your car window and restore its clarity. Let me share some tips and techniques based on my experience in dealing with paint stains on car windows.

When it comes to removing paint from a car window, it’s important to act quickly to prevent the paint from drying and bonding further. One effective method is to use a specialized paint remover that’s safe for glass surfaces. Be sure to choose a product that is specifically designed for automotive use and follow the instructions carefully. Another option is to use a mild solvent, such as rubbing alcohol or acetone, but be cautious as these can potentially damage the window if not used correctly.

Additionally, a clay bar can be used to gently remove any remaining paint residue once the bulk of the paint has been removed.

how to get paint off car window

How to Get Paint off Car Window

Getting paint on your car window can be frustrating, but don’t worry – there are several effective methods for removing paint without damaging the glass. Whether it’s a small accidental paint spot or a larger area that needs attention, you can try various techniques to get the paint off your car window. In this article, I will discuss different methods and steps you can take to remove paint from your car window safely and effectively.

Before you begin, make sure you have the necessary tools and materials for the job. You will need:

  • Gloves
  • Protective eyewear
  • Glass cleaner
  • Mild dish soap
  • Microfiber cloth
  • Plastic scraper
  • Rubbing alcohol

Now that you’re prepared, let’s explore some effective methods to remove paint from your car window.

Method 1: Using Soap and Water

One of the simplest and safest methods to remove paint from your car window is by using soap and water. Here’s how:

  • Fill a bucket with warm water and add a few drops of mild dish soap.
  • Wear gloves and safety glasses for protection.
  • Dip a microfiber cloth into the soapy water and wring out excess liquid.
  • Gently scrub the painted area on the window in a circular motion.
  • Rinse the window with clean water.

This method is effective for fresh paint stains that haven’t fully dried or cured. If the paint doesn’t come off easily with the soap and water, you may need to try a different method.

Method 2: Using Rubbing Alcohol

If the paint on your car window is stubborn and doesn’t come off with soap and water, you can try using rubbing alcohol:

  • Put on gloves and safety glasses.
  • Moisten a clean cloth or cotton ball with rubbing alcohol.
  • Gently dab the paint stain with the cloth or cotton ball.
  • Allow the rubbing alcohol to sit on the paint for a few minutes.
  • Using a plastic scraper, carefully scrape off the loosened paint.
  • Clean the window with a glass cleaner to remove any residue.

Rubbing alcohol is effective in loosening and removing dried or cured paint from car windows. However, be cautious not to use too much force or sharp tools that may scratch the glass surface.

Method 3: Using a Commercial Paint Remover

If the previous methods don’t work or if the paint on your car window is particularly stubborn, you may need to use a commercial paint remover. Here’s what you can do:

  • Put on gloves and safety glasses.
  • Read and follow the instructions on the commercial paint remover carefully.
  • Apply the paint remover to the affected area, following the product’s directions.
  • Allow the paint remover to sit for the recommended duration.
  • Using a plastic scraper, gently remove the loosened paint.
  • Wash the window with soap and water to remove any residue.

When using a commercial paint remover, it’s essential to follow the instructions provided by the manufacturer to ensure your safety and to avoid damaging the window or surrounding materials.

Preventive Measures for Car Window Protection

how to get paint off car window

Now that you know how to remove paint from your car window, it’s important to take preventive measures to protect the window from future paint splatters. Here are some steps you can take:

Park Away from Construction Sites

Try to park your car away from construction sites or areas where there is a possibility of paint overspray. This will significantly reduce the chances of paint landing on your car window.

Cover Your Car

If you anticipate any painting or spraying activities near your parked car, cover it with a car cover or a large plastic sheet. This will provide an extra layer of protection against paint splatters.

Use Tape for Delicate Areas

If you’re painting near your car window or any other delicate areas, use painter’s tape to cover and protect them. This will prevent paint from accidentally getting on your car window or other sensitive surfaces.

Clean Paint Accidents Promptly

If you do encounter a paint accident, clean it as soon as possible using the methods described earlier. The longer the paint stays on the window, the harder it may become to remove.

Frequently Asked Questions

Is it possible to remove paint from a car window without damaging it?

Yes, it is possible to remove paint from a car window without causing damage. However, it requires careful handling and the use of appropriate products and techniques. It is important to avoid using harsh chemicals or abrasive materials that can scratch or etch the glass.

One effective method is to use a paint remover specifically designed for automotive use. These products are usually safe for use on glass and can help break down the paint without harming the window. It is important to follow the instructions on the product carefully and test it on a small, inconspicuous area of the window first.

Can I use a razor blade to remove paint from a car window?

Using a razor blade to remove paint from a car window can be effective, but it should be done with caution and proper technique to avoid damaging the glass. It is recommended to wet the window with soapy water or a glass cleaner and then gently scrape off the paint using the razor blade at a 45-degree angle.

It is important to use a fresh razor blade to prevent scratching the glass further. Take care not to apply too much pressure and always keep the blade wet to avoid scratching the window. It is also advisable to tape off the surrounding areas with painter’s tape to protect them from accidental damage.

What are some alternative methods to remove paint from a car window?

If you prefer not to use a paint remover or a razor blade, there are alternative methods you can try to remove paint from a car window. One method is to use a clay bar, which is a soft and pliable material that can pick up contaminants, including paint, from the surface of the glass.

To use a clay bar, lubricate the window with a clay bar lubricant or soapy water and then gently rub the clay bar over the painted area in a back-and-forth motion. The clay bar will pick up the paint particles, leaving the window clean. Remember to knead the clay bar regularly to expose a clean surface.

How can I prevent paint from getting on my car’s windows?

To prevent paint from getting on your car’s windows, it is essential to take precautions before painting. Make sure to tape off the windows with painter’s tape or use plastic sheeting to cover them completely. It is also advisable to remove the wiper blades to avoid any paint splatter on them.

If you notice any paint splatter on the windows while painting, it is best to remove it as soon as possible using the recommended methods mentioned earlier. Quick action can help prevent the paint from drying and making it more difficult to remove.

Should I seek professional help to remove paint from my car window?

If you are uncertain about removing paint from your car window or if the paint has been deeply embedded into the glass, it may be best to seek professional help. Automotive detailers or glass repair specialists have the expertise and specialized tools to safely remove paint without causing any damage to the window.

Professional help can ensure the paint is removed effectively, and any potential risks are minimized. They can also provide recommendations on how to protect your car’s windows in the future and prevent paint from adhering to the glass surface.

If you have paint on your car window, don’t worry! There are a few simple steps you can follow to remove it.

First, try using a razor blade or a plastic scraper to gently scrape off the paint. Be sure to hold the blade at a shallow angle to avoid scratching the glass.

If scraping doesn’t work, you can use nail polish remover or rubbing alcohol. Apply a small amount to a cloth and gently rub the paint until it lifts off.

For stubborn paint, try using a commercial glass cleaner or a specialized adhesive remover. Apply the product to a cloth and carefully rub the area until the paint is gone.

Remember, it’s important to test any products or methods on a small, inconspicuous area of the window first to ensure they don’t damage the glass or tinting.

By following these steps, you’ll be able to remove paint from your car window easily and safely!

Conclusion

Removing paint from a car window may seem like a challenging task, but with the correct methods and tools, it can be done effectively. Whether you choose to use soap and water, rubbing alcohol, or a commercial paint remover, always prioritize safety and follow the instructions carefully. Additionally, taking preventive measures like parking away from construction sites and covering your car can help protect your car windows from paint splatters in the first place.

Remember to equip yourself with the necessary protective gear and materials, and be patient while removing the paint. With a little effort and the right approach, you can restore your car window to its original state.

A Step-by-Step Guide to Making a Paper Car


Have you ever wondered how to make a paper car? Well, here’s a fun and easy project that you can do at home! With just a few simple materials and a little creativity, you can create your very own paper car that you can zoom around and have a blast with. Let’s get started!

First, gather your materials. You will need some construction paper, scissors, glue or tape, and markers or crayons to decorate your car. Now, let’s talk about the design. You can make a classic sports car, a sleek and modern sedan, or even a wacky and unique vehicle of your own imagination. The choice is yours!

Start by folding a sheet of construction paper in half. This will form the base of your car. Then, cut out two rectangles to create the sides of the car. Attach the rectangles to the base using glue or tape. Next, cut out a smaller rectangle for the windshield and attach it to the front of the car. Finally, use markers or crayons to add details and personalize your car. And voila, you now have your very own paper car ready to race!

how to make a paper car

Introduction to Making a Paper Car

Have you ever wanted to create your own toy car? Making a paper car is a fun and rewarding craft project that you can enjoy with your friends or family. Not only does it allow you to unleash your creativity, but it also teaches you about the mechanics of a car.

Whether you’re a beginner or an experienced paper crafter, this article will provide you with step-by-step instructions on how to make a paper car. So grab your paper, scissors, and glue, and let’s get started on this exciting journey of creating a paper car!

To begin, let’s gather the materials you’ll need for this project:

  • Thick paper or cardstock
  • Scissors
  • Glue or adhesive
  • Markers or colored pencils

With these materials in hand, you’re ready to dive into the world of paper car making. Let’s explore the step-by-step process of creating a paper car and become a master in this craft!

Creating the Base of the Paper Car

The first step in making a paper car is creating the base, which includes the body and the wheels. Follow these steps to get started:

Step 1: Choose a Car Design

Before you start cutting and folding your paper, think about the type of car you want to create. Will it be a classic sedan, a sports car, or a vintage vehicle? Having a clear idea of the design will help you throughout the process. You can also find printable templates of different car designs online if you prefer to have a guide.

Step 2: Draw or Print the Car Template

If you’re confident in your drawing skills, you can create a car template by hand. Use a ruler to draw straight lines for the body and wheels. Alternatively, you can search for a car template online and print it out. Make sure the template is the right size for your project.

Step 3: Cut Out the Car Template

Carefully cut out the car template using scissors. Take your time to ensure that the lines are smooth and precise. Remember to also cut out the wheel wells. These are the openings where the wheels will attach later on.

Step 4: Fold and Assemble the Body

Now, fold along the designated lines to create the shape of the car body. Use a ruler if needed to make the lines crisp and straight. Apply glue or adhesive to secure the folds in place. Allow the glue to dry before moving on to the next step. This will ensure that the body structure is sturdy.

Step 5: Attach the Wheels

Next, it’s time to attach the wheels to your paper car. Cut out four circles from thick paper or cardstock to serve as the wheels. Glue each wheel onto the wheel wells you cut out earlier. Make sure the wheels are securely attached and can rotate freely.

Adding Details and Personalization

how to make a paper car

Now that you have the basic structure of your paper car, it’s time to add some details and personalize it. This will give your car a unique touch and make it truly your own. Here are some ideas to consider:

Paint or Color the Car

Use markers or colored pencils to add color to your paper car. Think about the colors you want for the body, windows, and any additional details. You can stick to realistic colors or get creative with vibrant shades. Let your imagination guide you as you bring your paper car to life!

Decorate with Stickers or Stencils

If you want to add extra flair to your paper car, consider using stickers or stencils. You can find stickers of headlights, racing stripes, or even license plates to make your car look more authentic. Alternatively, you can create your own stencils and use them to paint patterns or designs on the body of the car.

Add Accessories

Take your paper car to the next level by adding accessories. You can create side mirrors, spoilers, or even doors that open and close. Use small pieces of paper or cardstock to construct these features and attach them using glue or adhesive. Be careful not to overload the car with accessories, as it may become unstable.

Customize the Interior

Don’t forget about the interior of your paper car! Add seats, a steering wheel, and a dashboard using small pieces of paper or cardstock. This will make your car more realistic and complete. You can even draw or print out a tiny driver to place behind the wheel.

Frequently Asked Questions

What materials do I need to make a paper car?

To make a paper car, you will need the following materials:

  • A4 or letter-sized paper
  • Scissors
  • Glue or tape
  • Markers or colored pencils (optional)

You can use any type of paper, but cardstock or thicker paper works best for making a sturdy paper car.

How do I fold the paper to start making the car?

To fold the paper for your paper car, follow these steps:

  • Take a sheet of paper and fold it in half diagonally to make a triangle.
  • Unfold the paper, then fold the top and bottom edges towards the center crease.
  • Flip the paper over and fold the left and right corners towards the center crease.
  • Unfold the paper partially to create the base shape for your car.

This basic folding technique will give you the foundation to start making your paper car.

Can I customize my paper car with different designs?

Absolutely! You can personalize your paper car by adding different designs and colors. Here’s how:

  • Before folding the paper, use markers or colored pencils to add your desired designs.
  • Once you’ve decorated the paper, follow the folding instructions as mentioned earlier.
  • Your custom designs will be visible on the exterior of the paper car.

Get creative and have fun while making your own unique paper car!

How can I make the wheels for my paper car?

To make wheels for your paper car, follow these steps:

  • Take another sheet of paper and fold it in half.
  • Draw a circle on the folded edge, leaving a small portion unattached to create the wheel axle.
  • Cut out the circle along with the attached portion.
  • Repeat this process to create all the wheels you need for your paper car.

Attach the wheels to the body of the car using glue or tape, and you’ll have a functional paper car ready to roll!

How can I add more details to my paper car?

If you want to add more details to your paper car, try the following:

  • Use markers or colored pencils to draw windows, headlights, and other features on your car.
  • Cut out small shapes from colored paper and glue them onto the car to create additional details.
  • You can also use stickers or other craft materials to enhance the appearance of your paper car.

Adding these extra touches will make your paper car look even more realistic and fun!

Conclusion

Congratulations! You have successfully learned how to make a paper car from scratch. This creative and hands-on project allows you to exercise your imagination and craftsmanship skills. Whether you’re building a simple sedan or a detailed sports car, the process of making a paper car is both enjoyable and educational.

Remember to have fun with your design, experiment with different techniques, and take pride in your finished creation. Happy crafting!