Recent Posts

Timeless Beauty: Inside the 1955 Chrysler Ghia Streamline X


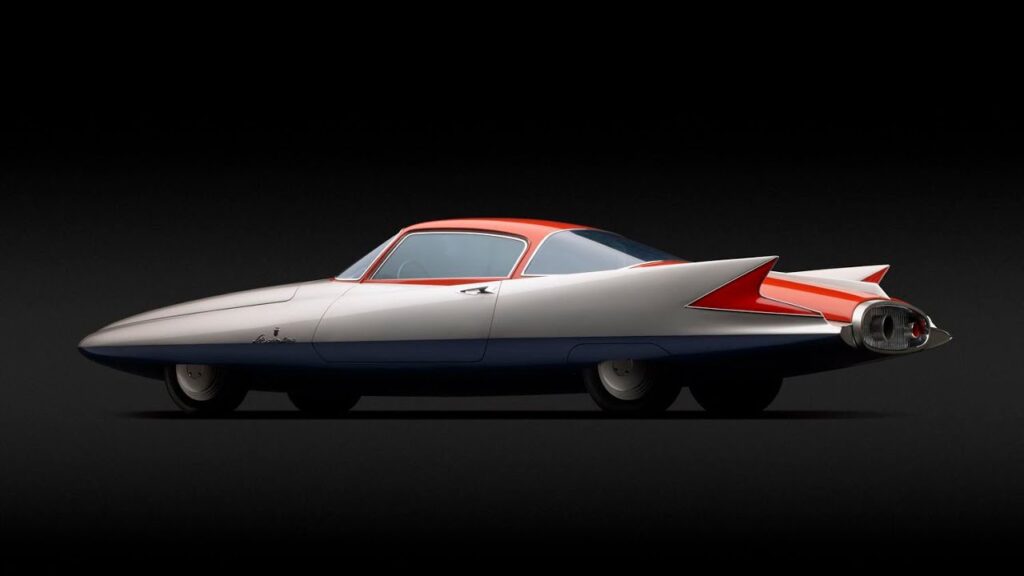
Step into the time machine of automotive history to discover the remarkable 1955 Chrysler Ghia Streamline X, a concept car that was the embodiment of mid-20th-century automotive design dreams. The mid-1950s was a dynamic period in both the automotive industry and the broader cultural landscape. It was an era of innovation, with designers and engineers pushing the boundaries of what was possible in the realm of car design. The Chrysler Ghia Streamline X emerged as a testament to this spirit, showcasing the fusion of art and engineering, and it continues to captivate enthusiasts and collectors today.

In this exploration, we’ll delve into the design, features, and the lasting legacy of this extraordinary concept car.
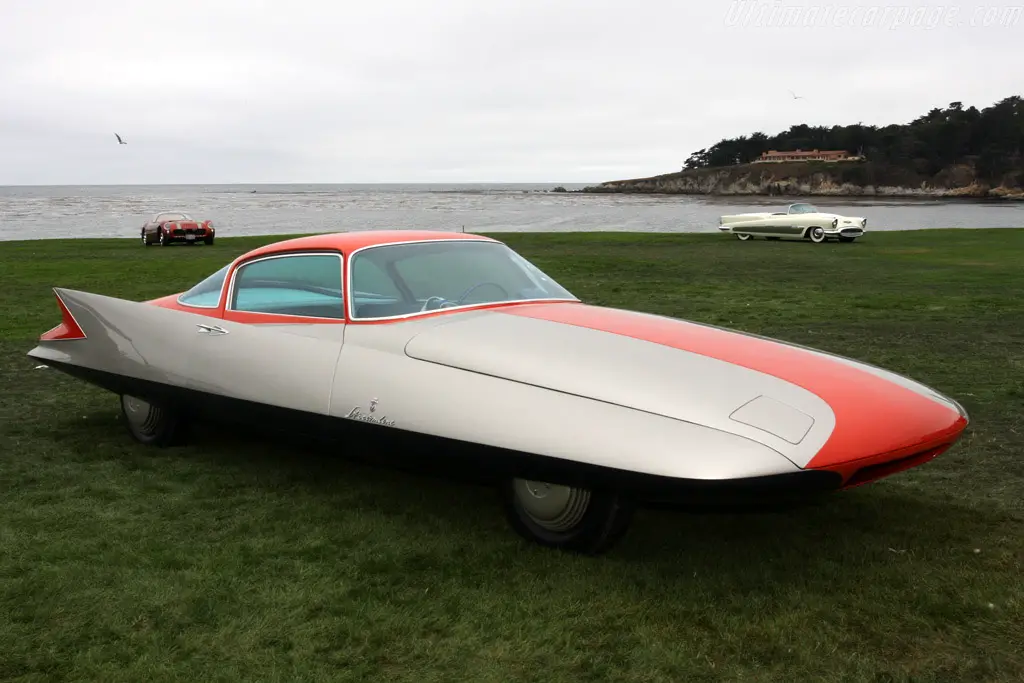
1955 Chrysler Ghia Streamline X exterior

Exterior Design

Sleek Aerodynamic Design

The car’s exterior exhibits a streamlined, aerodynamic appearance through:

  • Curvaceous Body: The vehicle boasts a sleek, curved body design, minimizing air resistance and enhancing efficiency.
  • Rounded Edges: Smooth and rounded edges contribute to reduced drag and improved airflow over the vehicle’s surface.
  • Integrated Spoiler Elements: Concealed spoiler elements aid in directing airflow, enhancing stability at higher speeds.
  • Flush-Mounted Door Handles and Mirrors: Features like flush-mounted door handles and mirrors reduce aerodynamic drag, contributing to the car’s sleek appearance.

Futuristic Aesthetics

Setting it apart from its contemporaries, this car showcases distinctive elements:

  • Unconventional Lighting: Utilizes innovative lighting designs, possibly with embedded LED strips or unique headlight configurations that were unconventional for the era.
  • Unique Body Panels: Incorporates unusual materials or design elements, possibly utilizing composite materials or shapes not commonly seen in cars from that time period.
  • Pop-Up Features: May have retractable components or hidden features that emerge when the car is in motion or activated, giving it an avant-garde and futuristic vibe.

Interior and Features

Stylish Interior

The interior of the vehicle features luxury and sophistication through:

  • Plush Upholstery: High-quality, plush materials such as leather or custom fabrics adorning seats and interior surfaces.
  • Ergonomic Design: Comfort-focused, with ergonomically designed seats and ample space for occupants.
  • Refined Finishes: Fine wood trims, metallic accents, or other high-quality finishes that exude luxury.

Innovative Technology

The car’s interior hosts cutting-edge technology that was ahead of its time:

  • Advanced Instrumentation: Digital or uniquely styled analog displays that provided comprehensive vehicle information in a futuristic manner.
  • Innovative Controls: Possibly touch-sensitive or unconventional controls for various vehicle functions, steering away from the traditional layout.
  • Integrated Entertainment: A state-of-the-art sound system, potentially integrated with other entertainment features, considering the futuristic context of the era.

Performance and Driving Experience

Engine and Performance

The 1955 Chrysler Ghia Streamline X was equipped with advanced features for its time:

  • Engine Specifications: Powered by a potent V8 engine, offering impressive horsepower and torque figures, delivering robust performance for that era.
  • Innovative Engineering: The vehicle incorporated various technological advancements in its engine and drivetrain, showcasing Chrysler’s engineering prowess.

Ride Quality

The car emphasized a balance of comfort and handling:

  • Comfortable Suspension: Employed a sophisticated suspension system for a smooth and comfortable ride, considering the era’s standards.
  • Handling: Offered competent handling and stability owing to its streamlined design, providing a refined driving experience.

Cultural Significance

Icon of Innovation

1955 Chrysler Ghia Streamline X
Credit: ultimatecarpage.com

The Chrysler Ghia Streamline X symbolized innovation in automotive design:

  • Revolutionary Design: Its futuristic design and technological features made it an icon of innovation, showcasing the possibilities of automotive engineering.
  • Cutting-Edge Features: The car’s advanced technology and futuristic design elements were ahead of its time, garnering attention and acclaim for its forward-thinking approach.

Pop Culture Impact

While not extensively documented, its unique design might have made appearances in cultural spheres, potentially influencing design elements in later automotive and sci-fi media.

Legacy and Influence

Design Influence

The Chrysler Ghia Streamline X’s innovative design elements have influenced future automotive designs:

  • Aesthetics: Its streamlined design and advanced features inspired and influenced subsequent automotive designs, especially in shaping future car aerodynamics and aesthetic elements.
  • Technological Innovations: Pioneering technological elements possibly influenced the development of future automotive technology and features.

Cultural and Historical Impact

Its legacy in automotive history remains as a beacon of design innovation and technological advancement during its era.

Collectibility and Rarity

Collectors’ Car

The Chrysler Ghia Streamline X is highly sought after by classic car enthusiasts:

  • Rarity: Its limited production run and unique design make it a rare and prized collectible.
  • Desirability: Among collectors, it’s highly desirable due to its historical significance and groundbreaking design.

Value and Restoration

  • Market Value: In pristine condition, this car can command a high value at auctions and among vintage car collectors, possibly fetching substantial six or seven-figure amounts.
  • Restoration: Restoration of this vehicle is a meticulous process, demanding attention to detail, sourcing of authentic parts, and skilled craftsmanship due to its rarity and historical importance.

Conclusion

The 1955 Chrysler Ghia Streamline X stands as an emblem of automotive innovation and forward-looking design. With its revolutionary streamlined exterior, powerful V8 engine, and futuristic interior, it showcased unparalleled engineering for its time. Its cultural impact and influence on subsequent car designs remain significant, elevating its status as a prized collector’s item.

The car’s rarity, coupled with its historical and design significance, cements its place as a cherished artifact in automotive history, captivating enthusiasts and collectors alike.

How to Extend the Life of Your Winch Rope or Cable – A Comprehensive Guide


The longevity and reliability of your winch rope or cable are pivotal to the success of any off-road adventure or recovery operation. Neglecting their maintenance not only compromises your safety but also the effectiveness of your winching endeavors.

In this guide, we will delve into the crucial aspects of winch rope/cable maintenance, emphasizing the importance of safety measures and providing an overview of the comprehensive steps to extend their service life. Whether you’re an off-road enthusiast or a professional, this guide will ensure your winching experiences remain secure and efficient.

How to Extend the Life of Your Winch Rope
warn.com

Understanding Your Winch Rope

Winch ropes and cables come in various materials, each with its unique characteristics and applications. When it comes to winch ropes and cables, you have several options to choose from.

Synthetic ropes are prized for their lightweight and flexibility, making them ideal for many off-road applications. They are less likely to cause injury when under extreme tension and are easier to handle.

On the other hand, steel cables are known for their robustness and durability, making them suitable for heavy-duty tasks. Understanding the characteristics and applications of different materials is the first step in selecting the right winch rope or cable to suit your specific needs.

However, the lifespan of your winch rope or cable is influenced by various factors. One of the primary considerations is how frequently you use your winch and the magnitude of the loads it handles. Intense usage and heavy loads can accelerate wear and tear.

Environmental factors, including exposure to moisture, UV radiation, and temperature extremes, can also impact the material’s durability. Recognizing these factors and their effect on your winch rope or cable’s longevity is essential for proactive maintenance and care.

Regular Inspection and Cleaning

Routine inspections and proper cleaning are essential aspects of winch rope and cable maintenance. The importance of routine inspections cannot be overstated. They serve as the first line of defense, allowing you to identify any potential issues before they escalate.

Regularly checking for damage, wear, and other signs of deterioration ensures that your winch rope or cable is in optimal condition, ready to perform when needed.

Inspecting for damage involves a careful examination of the entire length, paying particular attention to areas that are frequently exposed to stress. Kinks, fraying, or broken strands are clear indicators of problems that need to be addressed promptly.

This diligent inspection process not only ensures safety but also extends the life of your winch rope or cable.

Cleaning and removing debris from your winch rope or cable is equally important. Debris can accumulate on the surface, potentially causing abrasion and damage over time. Proper cleaning, using mild detergents and a soft brush, keeps your winch rope or cable free from contaminants, enhancing its durability and performance.

Incorporating these routine inspection and cleaning practices into your winching routine will help you get the most out of your equipment, ensuring it remains reliable and safe.

Proper Winding and Unwinding Techniques

Mastering the art of proper winding and unwinding of your winch rope or cable is crucial for ensuring its longevity and efficiency. When spooling onto the winch drum, it’s essential to do it correctly to prevent bunching and uneven distribution.

An even layer of rope or cable minimizes the risk of kinks, which can lead to damage and reduced strength.

Unwinding is equally important as improper unwinding can result in frustrating knots and tangles. Preventing kinks and knots can save you time and prevent unnecessary wear on the rope or cable.

Taking care during the unwinding process by guiding the rope evenly and preventing sudden jerks can make a significant difference in maintaining the integrity of your winch rope or cable.

In addition to proper spooling and unwinding, consider adopting effective cable layering techniques. Ensuring that the cable winds evenly onto the drum without overlapping or leaving gaps is critical.

Proper cable layering not only extends the life of your winch rope or cable but also contributes to smooth, reliable winching operations. By following these techniques, you’ll not only maximize the lifespan of your winch rope or cable but also ensure safer and more efficient winching experiences.

How to Extend the Life of Your Winch Rope or Cable
motortrend.com

Storage and Maintenance of Winch Cable

Proper storage and maintenance practices are fundamental in preserving the lifespan of your winch rope or cable. Ideal storage conditions involve keeping the rope or cable in a cool, dry, and well-ventilated area. Avoid exposing it to extreme temperatures and direct sunlight, as these conditions can accelerate wear and deterioration.

Lubrication and rust prevention are key components of maintenance. Applying an appropriate lubricant to the rope or cable helps to reduce friction and prevent damage from abrasion. Periodically inspect and reapply lubrication as needed.

Additionally, protect against rust, especially for steel cables, by using rust-inhibiting products or keeping them dry and free from moisture.

Furthermore, shield your winch rope or cable from UV damage, which can weaken synthetic ropes over time. UV-resistant coatings or storage covers can offer protection.

By implementing these storage and maintenance practices, you’ll ensure that your winch rope or cable remains in optimal condition, ready for reliable and safe performance when you need it most.

Avoiding Overloading and Shock Loads

To extend the life of your winch rope or cable, it’s crucial to understand and respect safe load limits. Overloading is one of the quickest ways to cause irreparable damage. Each winch rope or cable has a specified capacity, and exceeding it can lead to failure or even dangerous accidents.

Proper usage techniques are essential to avoid overloading and shock loads. Always apply steady, controlled force when winching, and never subject your equipment to abrupt or jerky movements. This not only preserves your rope or cable but also enhances safety during operations.

For heavy loads that approach the winch’s maximum capacity, it’s wise to use snatch blocks. These pulley-like devices effectively distribute the load and reduce the strain on your rope or cable.

Using snatch blocks not only protects your equipment but also ensures a smoother winching experience. By following these principles, you’ll not only extend the life of your winch rope or cable but also ensure safe and effective winching operations.

Repairing and Replacing Damaged Sections

Understanding when and how to repair or replace damaged sections of your winch rope or cable is crucial for maintaining its longevity and safety.

Identifying repairable damage involves a thorough inspection of the rope or cable, where you should look for minor issues like small cuts, fraying, or abrasions that haven’t compromised its structural integrity.

For minor damage, the steps for repair are relatively simple. You can use splicing techniques or repair kits designed for winch ropes to mend small cuts or frayed areas. Properly executed repairs can significantly extend the life of your rope or cable.

However, it’s essential to know when to replace your winch rope or cable. Severe damage, such as deep cuts, multiple frayed sections, or broken strands, may indicate that the integrity of the rope or cable is compromised.

At this point, it’s safer to replace the entire length rather than attempting repairs. Understanding the distinction between repairable and irreparable damage is critical to maintaining safety and effectiveness during winching operations.

Wrap Up

To preserve the life of your winch rope or cable, it’s crucial to grasp the nuances of its care and usage. Understanding its type, identifying damage, and conducting regular inspections are fundamental. Employing proper winding and unwinding techniques, maintaining storage conditions, and safeguarding against UV damage are equally important.

To ensure longevity, it’s essential to avoid overloading, adopt safe usage practices, and consider the use of snatch blocks for heavier loads. Recognizing when to repair minor damage and when to opt for replacement adds the finishing touch to securing safe and efficient winching experiences.

Diving into History: The Unique 1961 Amphicar Model 700


The Amphicar Model 700, an intriguing hybrid of a car and a boat, made its debut in the 1960s, capturing hearts with its dual capability to traverse both land and water. A feat of engineering innovation, this amphibious vehicle embodied the fascination with boundary-pushing designs that defined the era. Its distinctive design and technical duality not only marked an era but also continues to inspire awe and curiosity in today’s automotive landscape.

Let’s delve into the history, features, and unique qualities that make the 1961 Amphicar Model 700 a timeless gem of automotive innovation.

1961 amphicar model 700
Credit: bmxlovesk.xyz

Exterior and Design

Dual-Purpose Design

The car’s amphibious nature should be reflected in the design, featuring characteristics that enable functionality both on land and in water. The exterior design should encompass:

  • Hydrodynamic Shape: The vehicle’s body should possess a streamlined and hydrodynamic design to facilitate movement in water, reducing resistance and enhancing buoyancy.
  • Sealed Components: Seals around doors, windows, and other vulnerable points to prevent water from entering the vehicle during aquatic operations.
  • Retractable Features: Potentially retractable wheels or mechanisms to switch between land and water modes seamlessly.

Body Structure

The structure should integrate both land and water functionalities:

  • Lightweight Materials: Utilize materials that are durable, lightweight, and corrosion-resistant for optimal performance both on land and in water.
  • Reinforced Underbody: A reinforced underbody design to withstand water pressure and support buoyancy.
  • Amphibious Tires: Tires designed to provide traction on land and aid in propulsion in water, maybe with retractable treads for better aquatic performance.

Engine and Performance

Engine Specifications

For a vehicle that operates on both land and water, the engine needs to cater to both terrains:

  • Dual-Mode Engine: An adaptable engine capable of performing efficiently both as a conventional land vehicle and as a water propulsion system.
  • Power Output: Balanced power output suitable for driving on roads and providing adequate propulsion in water.

Amphibious Capabilities

Efficient transition and functionality between land and water modes are crucial:

  • Mode Transition Mechanism: Smooth transition mechanism between land and water operations, potentially involving retractable propellers or an integrated water propulsion system.
  • Control Systems: Sophisticated control systems to manage the vehicle’s functionality in different environments, including steering, stability, and speed adjustments for both land and water operations.

Interior and Comfort

Dual Nature Interior

1961 amphicar model 700 INTERIOR
Credit: supercars.net

The interior design should reflect the vehicle’s dual capabilities, ensuring comfort and functionality in both environments:

Water-Resistant Materials

Use materials that are water-resistant and easy to clean to accommodate potential exposure to water.

Sealed Interior

Implement a sealing system to protect the interior from water intrusion during aquatic operations.

Adjustable Features

Seats and controls that can be adapted for both land and water use, considering different driving positions and functionalities.

Comfort and Usability

Ensuring a comfortable and practical experience on both land and water:

Ergonomic Design

Comfortable seating and controls for extended use in various terrains.

Climate Control

Adequate climate control systems that function in both dry and wet environments.

Visibility

Optimized visibility for both on-road and in-water navigation, considering different angles and potential water reflections.

Handling and Performance in Water

Water Dynamics

Evaluating the vehicle’s performance when in water is crucial for its success:

  • Maneuverability: Responsive steering and maneuvering capabilities to navigate effectively in water.
  • Stability: Stability systems to maintain equilibrium and prevent capsizing or instability during aquatic operations.
  • Speed and Propulsion: Efficient propulsion mechanisms that ensure reasonable speed and performance in water.

Amphibious Safety

Safety features and considerations during the transition between land and water modes:

  • Water Entry/Exit Systems: Safety measures for smooth transitions in and out of water, such as buoyancy aids or emergency flotation devices.
  • Safety Controls: Automated safety systems that engage during mode transitions to ensure a safe shift between land and water functionalities.
  • Visibility and Signaling: Enhanced visibility aids and signaling mechanisms for other water vessels to recognize the vehicle’s dual operation state.

Cultural Impact and Legacy

Pop Culture Presence

The Amphicar Model 700 had a unique cultural impact:

Media Appearances

The car gained recognition through appearances in movies, TV shows, and various media for its dual land-water capabilities, creating a fascination with its versatility.

Iconic Status

Its unusual dual-purpose design made it a minor cultural icon, featuring in films like “The President’s Analyst” and various documentaries, cementing its status as a novelty.

Legacy

The Amphicar Model 700 holds a notable place in history and vehicle design:

Pioneering Design

As one of the first mass-produced amphibious vehicles for public use, the Amphicar left a mark in automotive history for its innovative approach to amphibious capabilities.

Influence on Amphibious Designs

Its design principles and the lessons learned from its production have influenced subsequent amphibious vehicle designs, impacting engineering perspectives on dual-terrain vehicles.

Collectibility and Rarity

Collectors’ Appeal

The Amphicar’s uniqueness makes it highly sought after among collectors:

Rarity

Only a limited number of Amphicar Model 700s were produced (around 3,800), contributing to its rarity and desirability among car collectors.

Niche Appeal

Its dual functionality as a car and boat makes it an attractive item for collectors interested in both automotive and marine history.

Restorations and Pricing

Restoration Challenges

Restoring an Amphicar Model 700 is a specialized task due to its unique design. Finding original parts and ensuring both its land and water capabilities are fully operational can be challenging.

Current Value

Depending on condition and operational status, a fully restored 1961 Amphicar Model 700 can command a significant value in the collector’s market, potentially ranging from tens of thousands to over a hundred thousand dollars.

FAQs

Can the Amphicar Model 700 be Driven on Regular Roads?

Yes, the Amphicar Model 700 was designed for both land and water use. It has road capabilities similar to a regular car. On land, it can travel at regular speeds just like an everyday vehicle.

Is the Amphicar Model 700 Safe for Use in Water?

When properly maintained and used within its intended parameters, the Amphicar is relatively safe for water use. However, like any vehicle, it’s essential to follow proper safety procedures and take necessary precautions. It’s advisable to avoid rough waters or adverse weather conditions.

Wrap Up

The 1961 Amphicar Model 700 stands as an exceptional automotive anomaly, bridging the divide between land and water travel. Its innovative dual-purpose design allowed for both on-road and in-water adventures, reflecting the audacious spirit of its era.

As an icon of hybrid engineering, it retains a timeless allure, serving as a captivating chapter in the fascinating history of automotive innovations, delighting enthusiasts and captivating the imagination of all who encounter this truly unique vehicle.

How to Jumpstart a Car: A Quick and Easy Tutorial


Knowing how to jumpstart a car is not just a valuable skill; it’s an automotive lifeline. Dead car batteries can strike when you least expect it, and a quick, effective jumpstart can save the day. This tutorial equips you with the know-how to handle common battery issues confidently.

By understanding the common causes of dead batteries and taking necessary safety precautions, you’ll not only rescue your vehicle but also boost your confidence as a driver. In this guide, we’ll walk you through the steps of a jumpstart, ensuring you’re well-prepared for any unexpected roadside situation.

How to Jumpstart a Car Easily

Understanding the Basics

A jumpstart, in its essence, is a practical method to revive a vehicle with a dead battery by drawing power from another functioning car. It’s a skill that can save the day when your car refuses to start due to a drained battery.

Understanding the primary reasons for a dead car battery is crucial. Common culprits include leaving your lights on, extreme weather conditions, or an aging battery. Recognizing these factors can help you take preventive measures to avoid future battery failures.

Equally important is identifying the tools and equipment necessary for a successful jumpstart. The primary tool you’ll need is a set of jumper cables. These sturdy cables with clamps at each end play a pivotal role in transferring the energy from the donor vehicle to your dead battery, jumpstarting your car and getting you back on the road.

With these fundamentals at your fingertips, you’ll be well-equipped to tackle the unexpected challenge of a dead battery with confidence.

Safety Precautions Before Attempting a Jumpstart

Safety should always be the top priority when jumpstarting a car. Before attempting a jumpstart, take time to understand and implement essential safety precautions.

This includes making sure both vehicles are in a safe location, turning off ignitions, and wearing safety gear like gloves and safety glasses to guard against potential sparks. Preventing electrical shocks is crucial; always handle jumper cables with care, ensuring the clamps don’t touch each other or any metal surfaces.

By maintaining a safe and controlled environment and adhering to these safety guidelines, you can ensure a trouble-free jumpstart, protecting your vehicle from any potential hazards.

Connecting the Jumper Cables

Step 1: Positioning the Vehicles

Before starting the jumpstart process, ensure that both vehicles are in a safe location, with their engines turned off. Position them so that they are not in direct contact but are close enough for the jumper cables to reach between their batteries.

Step 2: Locating the Battery Terminals

Identify the battery terminals on both the dead and working vehicles. They are typically labeled as positive (+) and negative (-). Take a moment to familiarize yourself with these terminals before proceeding to avoid any confusion during the connection process.

Step 3: Connecting the Jumper Cables Correctly

a. Attach one end of the red (positive) jumper cable to the positive terminal of the dead battery.

b. Connect the other end of the red (positive) cable to the positive terminal of the working (donor) battery.

c. Attach one end of the black (negative) jumper cable to the negative terminal of the working (donor) battery.

d. Finally, connect the other end of the black (negative) cable to an unpainted metal surface on the dead car’s frame, away from the battery. This grounding point helps prevent sparks near the battery.

Step 4: Avoiding Common Mistakes

Ensure that the cable clamps are securely attached to the battery terminals and are not loose. Make certain that the jumper cables do not touch each other during the connection process to prevent sparks. Double-check that you have followed the correct sequence of connections to minimize the risk of electrical issues.

How to Jumpstart a Car Step by Step

Jumpstarting a car involves a sequence of steps to safely transfer power from a functioning vehicle to one with a dead battery.

How to Jumpstart a Car

Step 1: Starting the Functioning Vehicle

First, start the functioning vehicle’s engine. This car will serve as the donor vehicle, supplying power to jumpstart the dead battery. Allow it to run for a few minutes, which helps charge the dead battery and ensures a steady power supply for the jumpstart.

Step 2: Waiting and Revving the Engine

After starting the donor vehicle, wait for a few minutes. If the dead battery is severely depleted, it may need more time to charge. Once some time has passed, you can gently rev the engine of the functioning vehicle. This can provide an extra surge of power to aid the jumpstart process.

Step 3: Starting the Dead Vehicle

Now, attempt to start the dead vehicle. If the jumpstart is successful, the engine should turn over. If the engine doesn’t start after a few tries, it’s crucial not to force it. Instead, you may need to seek professional assistance or assess the battery’s condition.

Step 4: Safely Disconnecting the Cables

Once the dead vehicle is running, it’s time to disconnect the jumper cables in the reverse order of how they were connected. Start by removing the black (negative) cable from the previously grounded point on the dead car’s frame.

Then, detach the black cable from the donor vehicle’s negative terminal, followed by the red cable from both vehicles. This order minimizes the risk of electrical issues. Once the cables are safely removed, you’ve successfully completed the jumpstart.

What If It Doesn’t Work?

In the event that your jumpstart attempt doesn’t succeed, there are some essential troubleshooting tips to consider. First, ensure that the jumper cables are securely connected to the battery terminals and that there are no loose or corroded connections.

If the dead battery is too worn out or damaged, a jumpstart may not be effective, and it could be time for a battery replacement. If the engine doesn’t respond after several attempts, it’s important not to force it, as this can lead to further damage.

At this point, it’s wise to consider seeking professional help, as they can diagnose the issue more accurately and provide the necessary repairs or a battery replacement if needed. Remember that your safety and the well-being of your vehicle are top priorities, and professional assistance can ensure both are maintained.

After a Successful Jumpstart

After a successful jumpstart, it’s crucial to recognize the importance of driving your vehicle for a sufficient duration to recharge the battery fully. This drive allows the alternator to replenish the energy used during the jumpstart and ensures that your battery is in good shape for the next journey.

To prevent future dead batteries, consider checking and addressing the common culprits, such as leaving lights or electronics on when the engine is off. Battery maintenance is key to longevity, so periodically inspect the battery’s condition and connections.

Keep the terminals clean and free of corrosion, and consider investing in a battery tender if your vehicle is not in regular use. By taking these preventive measures and maintaining your battery, you can avoid future surprises and ensure your car starts reliably every time.

Sum It Up

knowing how to jumpstart a car is a valuable skill that can rescue you from unexpected dead battery situations. Safety, systematic connections, and troubleshooting are key.

After a successful jumpstart, driving to recharge the battery is crucial, and preventive measures can help avoid future dead batteries. Regular maintenance and cautious habits keep your vehicle reliable and ensure you’re a more prepared and confident driver.

How to Change Your Car’s Oil: A Step-by-Step Guide


Changing your car’s oil isn’t just another task; it’s a vital aspect of vehicle maintenance. Regular oil changes are the lifeblood of your engine, ensuring peak performance and longevity. Beyond the mechanical benefits, there’s a practical reason to roll up your sleeves: substantial cost savings.

This DIY endeavour not only keeps your wallet fuller but also instils a sense of accomplishment and self-reliance. In this step-by-step guide, we’ll walk you through the process, empowering you to take control of your car’s well-being.

How to Change Car Oil

Gathering the Tools and Supplies

Before you dive into changing your car’s oil, it’s essential to gather the right tools and supplies. You’ll need a handful of items to ensure a smooth process. This includes the right oil and oil filter specific to your vehicle’s make and model.

Alongside these components, you’ll require a set of common tools, such as:

  1. A wrench
  2. An oil filter wrench
  3. An oil drain pan and
  4. A funnel
  5. Hand gloves
  6. Eye protection shield

How to Change Car Oil Step by Step

Step 1: Preparing Your Car

As you embark on the journey of changing your car’s oil, the preparation of your vehicle is a critical first step. Ensuring a safe and well-organized workspace is essential. We’ll cover parking and safety considerations to create a secure environment for your DIY oil change.

You’ll also learn how to safely raise and support your vehicle, allowing easy access to the components you need to work on. To kickstart this process, it’s crucial to know where to find the oil drain plug and oil filter in your specific make and model.

These preliminary steps will set the stage for a successful oil change, ensuring both your safety and the efficiency of the process.

Step 2: Draining the Old Oil

With your car properly prepared, it’s time to embark on the essential step of draining the old oil. First, unscrew the oil filler cap to allow air to flow, making the draining process smoother.

Then, carefully locate and remove the oil drain plug, usually found on the underside of your vehicle’s engine. As the old oil begins to flow, be sure to catch it in a suitable container for proper disposal, being mindful of environmental regulations.

This step ensures a clean slate for your engine, removing the worn-out oil and making way for fresh, high-performing lubrication.

Step 3: Changing the Oil Filter

Next in the process is changing the oil filter, a crucial component of your car’s oil system. To start, remove the old oil filter, which can often be found near the drain plug. It’s important to properly dispose of the old filter.

Then, prepare the new oil filter by lightly lubricating the rubber gasket with fresh oil to ensure a proper seal. Carefully screw the new oil filter into place, making sure not to overtighten it.

This step is essential for maintaining optimal oil flow and filtration, contributing to your engine’s health and performance.

Step 4: Adding Fresh Oil

How to Change Car Oil

With the old oil and filter replaced, it’s time to infuse your engine with fresh, clean oil. The first consideration is selecting the right type and grade of oil, ensuring it aligns with your vehicle’s specifications.

Using a funnel, carefully pour the new oil into the designated oil filler port. Be attentive and pour slowly to prevent spills. After adding the oil, check the oil level on the dipstick, ensuring it falls within the recommended range.

This step is crucial to maintain proper lubrication and engine function. By selecting the right oil and following these steps, you’re guaranteeing your vehicle’s peak performance and longevity.

Step 5: Checking for Leaks

Before considering your oil change complete, it’s vital to perform some final checks. After adding fresh oil, start the engine briefly to allow it to circulate the new lubricant, ensuring it reaches all the vital engine components.

After this, inspect the area around the oil drain plug and filter for any signs of leaks, which can be a potential concern. Finally, don’t forget to responsibly dispose of the used oil and filter in accordance with local environmental regulations.

This last step not only ensures the cleanliness of your workspace but also reflects your commitment to both your vehicle’s well-being and the environment.

Maintenance Tips and Schedule

Maintaining your car’s oil is just the beginning of a well-rounded vehicle care routine. Knowing how often to change your car’s oil is key; the frequency may vary depending on your vehicle’s make, model, and the type of oil used, so consult your owner’s manual for specific recommendations.

Additionally, consider other maintenance aspects such as checking and replacing the air filter, inspecting the brakes, and monitoring tire pressure.

To stay on top of all these tasks, keeping a maintenance log can be invaluable. It helps you track when various maintenance activities were last performed and ensures your car remains in peak condition, extending its life and performance.

Sum It Up

Changing your car’s oil is a critical part of vehicle maintenance. Regular oil changes improve engine performance and longevity. By following the steps in this guide, you can save money, gain a sense of accomplishment, and ensure your car runs smoothly.

Don’t forget safety precautions and maintaining a regular maintenance schedule. This knowledge empowers you to take charge of your vehicle’s well-being and enjoy worry-free driving for years to come.

Read Also:

How to Drive on Sand, Rocks, and Mud: Off-Road Techniques for Beginners – The Automobile

How to Make Bike Rack in Your Jeep or Suv – The Automobile

Unveiling the Quirky Charm: The 1973 Reliant Robin Review


The Reliant Robin, an iconic three-wheeled vehicle, remains a standout in automotive history. Produced during the early 1970s, this unique car made a significant mark. Amidst the socio-economic landscape of the era, when car culture was at a turning point, the Reliant Robin emerged as an unconventional yet practical choice for many. Its distinctive design, featuring a single wheel at the front, not only reflected the innovative spirit of the time but also introduced an affordable, fuel-efficient option.

In this blog, we’ll delve into the historical context that shaped the era and the remarkable story of the 1973 Reliant Robin.

1973 reliant robin
Credit: supercars.net

Exterior and Design

Unique Three-Wheel Design

The Reliant Robin’s most distinctive feature is its three-wheel design. The single wheel in the front sets it apart, making it both recognizable and unusual among cars of that era. The body structure, notably compact, is made of lightweight materials that contribute to its efficiency and unique look.

Aerodynamics and Practicality

Its wedge-like shape, though unconventional, contributes to its aerodynamic efficiency, allowing for better fuel economy and speed. The practical aspect of its design is clear in its compact size, making it easier to maneuver in urban environments and park in smaller spaces.

Engine and Performance

Engine Specifications

The Reliant Robin was equipped with a small-displacement engine, usually around 750cc, providing modest power for its size. The engine, positioned in the front, drove the single front wheel, powering the vehicle.

Driving Experience

While not a speed demon, the Reliant Robin offered a unique driving experience. Its lightweight design meant it was nimble and easily maneuverable. However, its handling and stability could be challenging, especially when turning, due to its weight distribution and single front-wheel drive.

The modest engine provided adequate performance for city driving and short commutes.

Interior and Comfort

Cabin Features

1973 reliant robin interior
Credit: not2grand.co.uk

The Reliant Robin’s interior, despite its compactness, was cleverly designed for space utilization. It accommodated three passengers, with a unique one-plus-two seating arrangement that made the most of the limited space. The dashboard was straightforward and simple, reflecting the utilitarian design of the era.

Comfort and Usability

While the interior wasn’t opulent, it provided practicality for its size. The seats were compact yet offered adequate comfort for short to medium-length journeys. The compact design allowed for good visibility and ease of access, contributing to the overall user-friendliness of the vehicle.

Handling and Safety

Handling Dynamics

The Reliant Robin’s handling was distinctive due to its three-wheel configuration, particularly with a single wheel in the front. This design created a unique driving experience, making it relatively easy to navigate through city traffic and tight spaces.

However, the lightweight construction and weight distribution sometimes posed challenges, especially during cornering and on adverse road conditions.

Safety Considerations

Safety features on the Reliant Robin were relatively standard for its time, consisting of the essential requirements such as seatbelts and standard braking systems.

However, due to its unique design, it was subject to different regulations and required a certain level of driver attentiveness and adjustment due to the nature of its three-wheel setup. The distinctive design posed certain risks in terms of stability and rollover potential, though, in general, it met the safety norms of the period.

Cultural Impact and Endurance

Pop Culture and Fame

The Reliant Robin has earned a place in pop culture due to its unusual design and inherent charm. It found itself prominently featured in various British TV shows and became a comedic icon. Its distinctive appearance and unique driving dynamics made it a memorable part of popular media, often associated with quirky and memorable moments.

Longevity and Collectibility

While not the most conventional classic car, the Reliant Robin has managed to achieve a level of collectibility. Its distinctiveness and memorable presence have endeared it to enthusiasts, especially those fascinated by unique automotive oddities.

Despite its reputation for being somewhat unstable and quirky, it stands as a symbol of a bygone automotive era and often earns a place at classic car events.

FAQs

Was the Reliant Robin considered safe to drive?

Despite its unique design and peculiar handling characteristics, the Reliant Robin did face safety concerns, mainly due to its tendency to tip over in certain conditions. This led to a somewhat negative reputation regarding safety.

While the vehicle’s design wasn’t prone to flipping under normal driving, its unique three-wheel layout made it less stable compared to traditional four-wheeled cars, especially on corners or in strong winds.

Why did the Reliant Robin fail?

The Reliant Robin encountered challenges and had a unique design that contributed to its limitations. While it was economical, lightweight, and classified as a three-wheeled motorcycle for tax purposes, its unconventional three-wheel design, with a single wheel at the front, caused handling issues. This layout made it prone to tipping over in sharp turns or strong winds, which raised safety concerns among consumers.

Additionally, the perception of the car’s stability issues affected its market acceptance, making it less appealing to potential buyers and contributing to its overall commercial limitations and relative lack of success in the automotive market.

Conclusion

The 1973 Reliant Robin stands as an iconic symbol in automotive history, celebrated for its distinct three-wheel design and unique features. While its notoriety stemmed from its handling quirks and safety concerns, it undeniably left a lasting imprint on pop culture and remains a collectible classic today.

As a product of its time, this pioneering vehicle continues to be remembered for its character, idiosyncrasies, and enduring cultural impact, cementing its place in the fascinating annals of automotive lore.