
In the automotive world, understanding how to jump-start a car is a fundamental skill that can save the day in various situations. From unexpected battery failures to lending a helping hand to a stranded friend, the ability to jump-start a car is a valuable tool in any driver’s repertoire. This blog delves into the importance of possessing this skill, shedding light on common scenarios that necessitate a jump-start.
Whether you’re facing a dead battery in the dead of winter or assisting a fellow motorist in need, mastering the art of jump-starting is a key aspect of being a responsible and well-prepared driver.
Understanding the Basics
Components Involved
To embark on the journey of jump-starting a car, it’s crucial to familiarize yourself with the key components. The star of the show is, of course, the battery – the powerhouse of your vehicle. Additionally, having a set of reliable jumper cables and access to a second vehicle are essential. This section unfolds the roles of each component, setting the stage for a successful jump-start.
Safety First
Before diving into the practical aspects, prioritizing safety is paramount. Highlight the importance of wearing safety glasses to shield your eyes from potential sparks.
Emphasize the need to ensure both vehicles involved are securely in park (or neutral for manual transmissions) and switched off. By making safety the top priority, readers are poised to handle the situation with confidence.
Assessing the Situation
Identifying a Dead Battery
Understanding when a jump-start is required is the first step in this process. Explore the subtle signs of a dead battery, such as dimming lights and the dreaded clicking sounds when you turn the key. By recognizing these indicators, readers gain the knowledge needed to diagnose a dead battery accurately.
Rule Out Other Issues
Not all issues that mimic a dead battery are, in fact, battery-related. Briefly discuss other potential culprits, like a faulty starter or alternator, and provide insights on how to rule them out.
This step ensures that readers troubleshoot effectively, saving time and effort in situations where a jump-start may not be the solution.
Preparing for Jump-Start
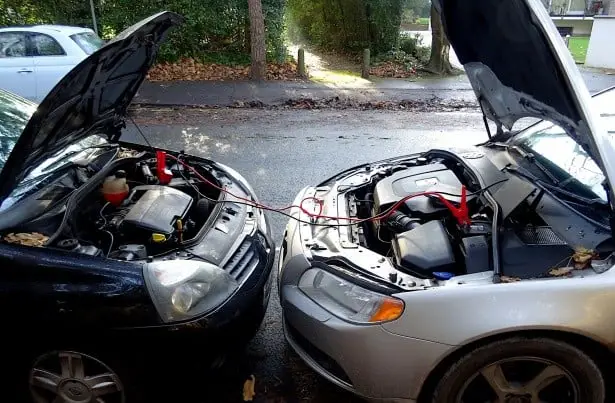
Positioning Vehicles
Proper positioning is the foundation for a safe and successful jump-start. Guide readers on how to position both the working vehicle and the one with the dead battery.
Emphasize considerations like maintaining a safe distance, ensuring both vehicles are not in direct contact, and positioning them in a way that facilitates easy access to the batteries.
Turning Off Electronics
Before diving into the jump-start process, it’s crucial to eliminate potential electrical interferences. Advise readers to turn off all electronics, such as lights, radios, and air conditioning, in both vehicles.
This precaution minimizes the risk of electrical issues during the jump-start and ensures a smoother process.
Connecting Jumper Cables
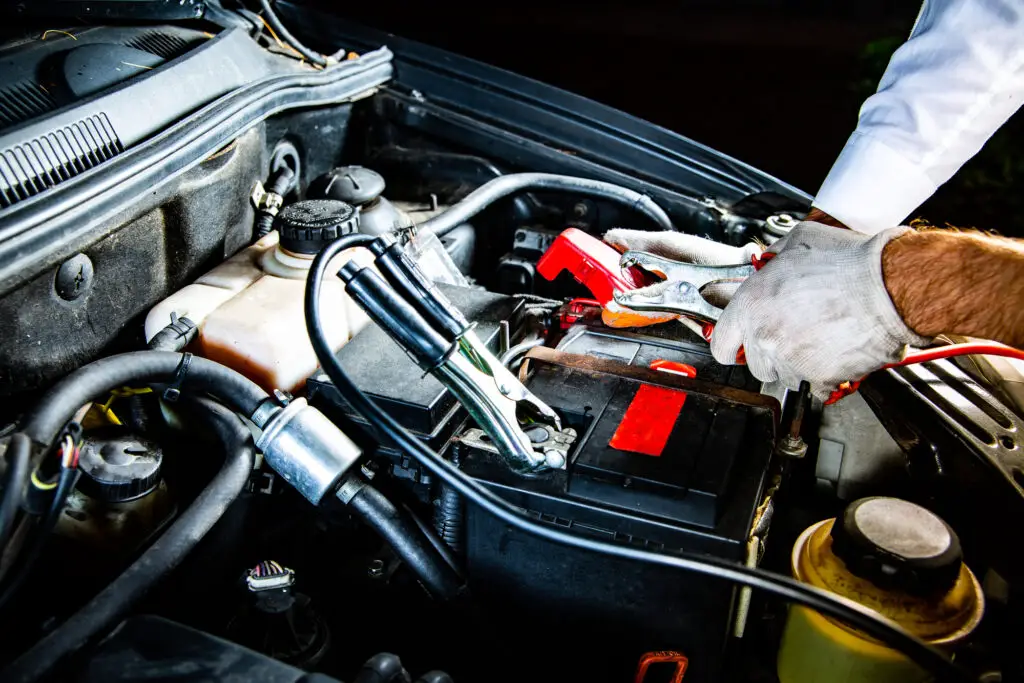
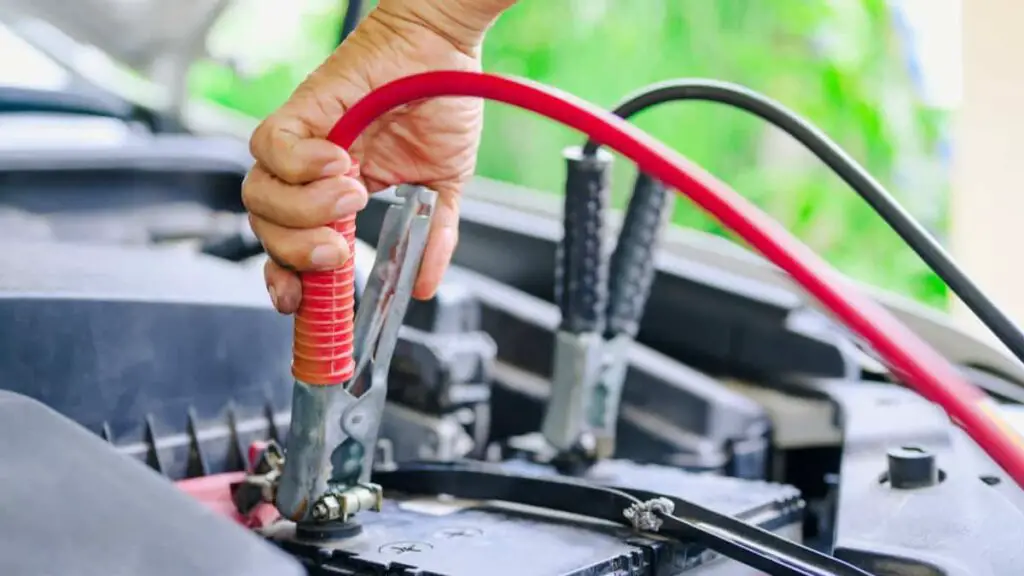
Positive and Negative Terminals
Delve into the specifics of connecting jumper cables correctly. Explain the importance of connecting to the positive and negative terminals in the right order. This section provides readers with a step-by-step guide on ensuring a secure and effective connection between the batteries.
Cautionary Notes
As readers embark on the cable connection process, highlight crucial precautions to avoid sparks and potential hazards.
Whether it’s emphasizing the importance of keeping the cables away from moving engine parts or stressing the need for precision in the connection sequence, these cautionary notes contribute to a safe jump-start experience.
Jump-Starting the Car
Starting the Working Vehicle
Guide readers through the process of starting the working vehicle. Highlight the importance of letting it run for a few minutes to allow the flow of charge to the dead battery. This step ensures that the working vehicle is ready to share its vitality effectively.
Attempting to Start the Dead Vehicle
Instruct readers on attempting to start the vehicle with the dead battery. Outline the steps to take if it doesn’t start on the first try, providing troubleshooting insights. This section empowers readers to handle the jump-start process with confidence, addressing potential challenges along the way.
Post-Jump Procedures
Removing Jumper Cables
After a successful jump-start, it’s essential to conclude the process safely. Explain the correct order for removing jumper cables from both vehicles to avoid electrical issues. Emphasize the importance of precision in this step to ensure a smooth disconnection without any sparks or disruptions.
Running the Revived Vehicle
Jump-starting isn’t the final chapter. Suggest keeping the revived vehicle running for a while. This allows the alternator to recharge the battery, ensuring it’s sufficiently powered for the next ignition. Encourage readers to be patient during this post-jump phase for optimal results.
When to Seek Professional Help
Knowing the Limitations
While jump-starting is a valuable skill, there are scenarios where it might not be enough. Discuss situations, such as a persistently dead battery or recurring issues, where seeking professional assistance becomes necessary.
Knowing the limitations of a DIY jump-start ensures that readers make informed decisions about the next steps.
Recommendations for Future Prevention
Prevention is often the best cure. Provide practical tips on how to prevent a dead battery in the future. This could include regular battery maintenance, periodic checks, and the importance of investing in a quality battery.
By arming readers with preventive measures, they can reduce the likelihood of encountering a dead battery and the need for frequent jump-starts.
FAQs
Can I jump-start a car by connecting the cables in any order?
No, it’s crucial to follow the correct order when connecting jumper cables. Start by connecting the positive (+) cable to the positive terminal of the working vehicle’s battery, then the other end to the positive terminal of the dead battery.
Follow the same sequence for the negative (-) cable, but connect the other end to a metal, unpainted part of the dead vehicle’s engine. This order minimizes the risk of sparks and ensures a safe jump-start.
How long should I run the revived vehicle after a jump-start?
It’s advisable to keep the once-dead vehicle running for at least 15-20 minutes after a jump-start. This allows the alternator to recharge the battery adequately. During this time, avoid using electronic accessories to maximize the charging efficiency.
If you’re planning to turn the vehicle off shortly after, it’s recommended to drive it for a longer duration to further charge the battery.
Conclusion
Mastering the skill of jump-starting a car is a valuable asset for any driver. From understanding the basics and safely connecting jumper cables to post-jump procedures and knowing when to seek professional help, this guide equips you with the knowledge to handle unexpected battery challenges.
Remember, prevention is key – regular battery maintenance and following safety protocols ensure a smoother journey. With these insights, you’re not just jump-starting cars; you’re empowering yourself to navigate the road with confidence and preparedness.