Recent Posts

How to Install Car Audio System


A road trip without good music is like a car without wheels—somehow incomplete. The significance of a quality car audio system goes beyond just sound; it sets the rhythm for an enjoyable driving experience. In this comprehensive guide, we’ll dive into the realm of car audio installation, emphasizing the pivotal role it plays in enhancing your time behind the wheel.

Beyond the jargon and complexity, we’re here to provide a step-by-step walkthrough, empowering you to install a car audio system seamlessly. Join us as we embark on this journey to amplify your driving pleasure through the installation of a stellar car audio setup.

How to Install Car Audio System
Credit: audiosport1.com

Preparing for Installation

Equipment and Tools

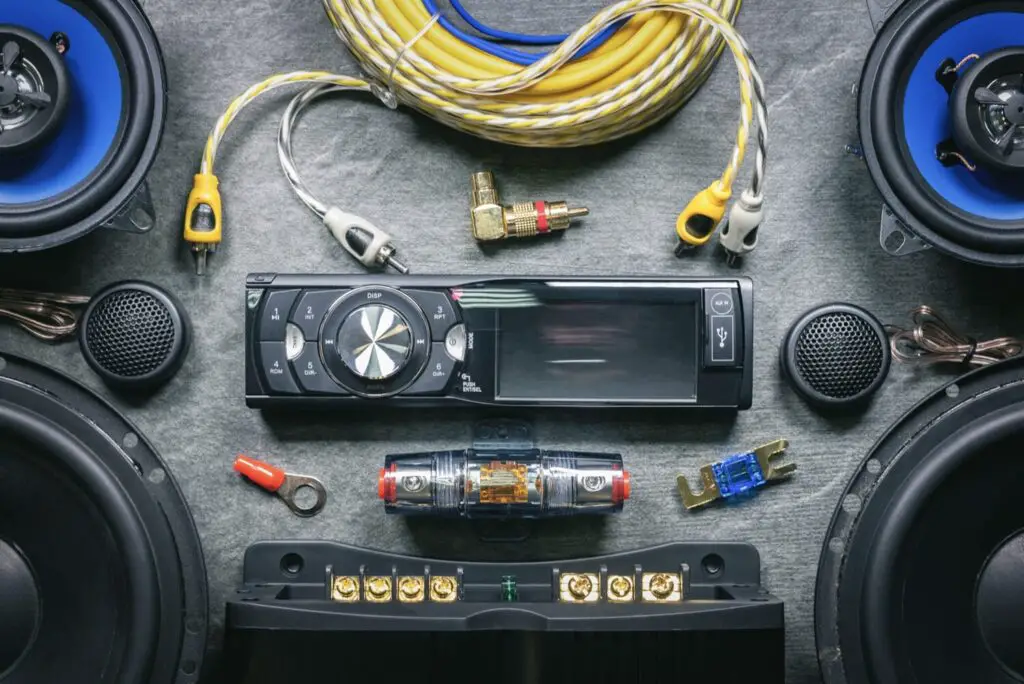
Gather necessary tools and equipment for a smooth installation:

  1. Wiring Harnesses: Compatible harnesses for seamless integration with the vehicle’s wiring.
  2. Speakers: Upgraded speakers suited for the car model.
  3. Head Unit: New head unit or stereo system compatible with the vehicle’s specifications.
  4. Wiring Tools: Wire strippers, crimpers, electrical tape, and connectors for proper wiring connections.

Safety Precautions

Prioritize safety throughout the installation process:

  1. Battery Disconnection: Disconnect the car battery to avoid electrical hazards during the installation process.
  2. Wiring Caution: Handle wiring carefully, ensuring proper insulation and avoiding short circuits.

Removing the Old System

Removing the car Old audio System
Credit: windupradio.com

Removing the Head Unit

Safely remove the existing head unit or stereo system:

  1. Disconnect Power: Turn off the car and disconnect the battery to avoid electrical mishaps.
  2. Trim Removal: Use appropriate tools to remove the trim panels around the head unit.
  3. Disconnect Wiring: Carefully detach wiring harnesses and antenna connections from the head unit.
  4. Head Unit Removal: Unscrew mounting screws/clips and slide out the old head unit/stereo.

Removing Speakers

Step-by-step process for speaker removal:

  1. Panel Removal: Access speakers by removing door panels or grilles, depending on their location.
  2. Disconnect Wiring: Gently detach speaker wiring, taking note of positive and negative connections.
  3. Speaker Extraction: Unscrew mounting screws and carefully remove the old speakers, avoiding damage to surrounding components.

Approaching the installation with the necessary tools, a focus on safety, and a systematic removal of the old system lays the groundwork for a successful car audio upgrade. Following these steps diligently ensures a smooth transition from the old to the new, minimizing the risk of damage and ensuring a seamless installation process.

Wiring and Installation Process

Wiring Harness Connection

Steps for wiring harness connection:

  1. Identification: Match the new wiring harness with the car’s harness by color or use a wiring diagram for compatibility.
  2. Connection: Use crimp connectors or soldering to secure matching wires—positive to positive and negative to negative.
  3. Insulation: Properly insulate connections using electrical tape or heat shrink tubing to prevent short circuits.

Mounting the Head Unit

Securely install the new head unit into the dashboard:

  1. Mounting Kit: Use a compatible mounting kit to fit the new head unit into the dash opening.
  2. Slide and Secure: Slide the head unit into the mounting sleeve and secure it using screws or clips provided.
  3. Reassemble Trim: Reattach trim panels around the head unit, ensuring a snug fit without obstructing functionality.

Installing New Speaker

Speaker Wiring

Connecting and securing new speakers to the car’s wiring system:

  1. Matching Wiring: Match speaker wiring with the car’s wiring—positive to positive and negative to negative.
  2. Secure Connections: Use crimp connectors or soldering and insulate connections properly for a secure fit.

Speaker Placement

Optimal positioning for better sound quality:

  1. Balanced Placement: Install speakers in locations that provide balanced sound distribution throughout the vehicle.
  2. Avoid Obstructions: Ensure speakers aren’t obstructed by panels or grilles, allowing sound to propagate freely.

Following these steps meticulously ensures a seamless installation process for the new head unit, speakers, and wiring connections. Proper matching and connection of wiring harnesses, secure mounting of the head unit, and strategic speaker placement all contribute to enhanced sound quality and a professional installation finish.

Testing and Fine-Tuning

Testing the System

Steps to ensure the audio system functions correctly:

  1. Power On: Reconnect the car battery and power on the new audio system.
  2. Functionality Test: Test each audio component—head unit, speakers, and all sources (radio, CD, Bluetooth, etc.) for proper functionality.
  3. Sound Check: Play different music genres to assess sound quality and ensure all speakers are producing sound.

Sound Adjustment

Fine-tuning settings for an enhanced audio experience:

  1. Equalizer Settings: Adjust bass, treble, and mid-range frequencies on the head unit’s equalizer for desired sound quality.
  2. Balance and Fader: Set the balance and fader settings to achieve balanced sound distribution across all speakers.

Troubleshooting and Tips

Troubleshooting Common Issues

Addressing potential installation problems and solutions:

  1. No Power: Check wiring connections, fuses, and ensure the head unit is receiving power.
  2. Audio Distortion: Verify wiring connections, speaker polarity, and equalizer settings.
  3. No Sound from Speakers: Check speaker wiring and connections to ensure they’re properly secured.

Additional Tips

Further guidance for a successful installation:

  1. Manual Reading: Refer to manuals for the head unit and speakers to understand all functionalities and settings thoroughly.
  2. Professional Help: If encountering persistent issues or discomfort with installation, seek professional assistance for a seamless experience.

FAQs

Why is Testing the Car Audio System Important After Installation?

Testing the newly installed car audio system is crucial to ensure everything functions as intended. This process verifies proper wiring connections, checks for any installation issues, and confirms the functionality of all components—head unit, speakers, and audio sources.

Testing allows users to identify potential problems early on, ensuring a hassle-free and enjoyable audio experience while driving.

How Do I Troubleshoot Common Issues After Installing a Car Audio System?

Several common issues might arise post-installation, such as no power to the head unit, audio distortion, or lack of sound from speakers. Troubleshooting involves checking wiring connections, ensuring proper power supply, verifying speaker polarity, and adjusting settings like the equalizer.

This step-by-step approach helps identify and resolve issues, ensuring optimal performance of the new audio system.

Wrap Up

In the realm of car audio upgrades, meticulous installation, testing, and fine-tuning yield the desired sound experience. Methodically installing components, testing functionality, and adjusting settings ensure a seamless transition to a superior audio system. Troubleshooting potential issues and seeking professional guidance when needed further refines the installation process.

Ultimately, the culmination of these steps guarantees not just the installation of a new system but the creation of an enhanced auditory journey, elevating the driving experience to new, melodic heights.

What to Put Under Tires when Storing Car


Tire care isn’t just about regular maintenance; it extends to proper storage, a pivotal aspect often overlooked. Ensuring your tires are well-preserved during periods of non-use is crucial to maintaining their quality and extending their lifespan.

In this article, we’ll shine a light on the criticality of storing tires correctly, emphasizing the impact it has on their longevity. Beyond the conventional methods, we’ll explore the necessity of employing suitable materials under tires during storage to shield them from potential damage. Join us as we unravel the secrets to preserving tire integrity, ensuring they’re road-ready whenever you’re ready to roll.

What to put under tires when storing car
Credit: astonmartinworks.com

Suitable Surfaces for Tire Storage

Concrete Surface

Storing tires directly on concrete can lead to issues:

  1. Flat Spotting: Prolonged contact with concrete can cause flat spotting, especially in colder temperatures or when tires bear weight for extended periods.
  2. Moisture Absorption: Concrete can draw moisture, potentially leading to accelerated rubber degradation or corrosion of steel belts within the tires.

Wooden Boards

Elevating tires on wooden boards or pallets offers advantages:

  1. Protection from Contact: Wooden boards prevent direct contact with the ground, reducing the risk of flat spotting or moisture absorption.
  2. Air Circulation: Elevating tires allows air to circulate beneath them, aiding in moisture evaporation and preserving tire integrity.

Tire Storage Accessories

Tire Storage Accessories
Credit: garagecabinets.com

Tire Bags/Covers

Using tire bags or covers provides multiple benefits:

  1. Protection from Elements: Shield tires from dust, UV rays, and moisture, preserving rubber integrity and preventing premature aging.
  2. Cleanliness: Keep tires clean during storage, reducing the need for extensive cleaning before installation.

Tire Racks or Stands

Tire racks or stands offer practical advantages:

  1. Organization: Store tires neatly and efficiently, saving space and facilitating easy access when needed.
  2. Proper Air Circulation: Elevating tires on racks allows air circulation, minimizing moisture retention and aiding in tire preservation.

Utilizing suitable surfaces and accessories for tire storage significantly impacts tire longevity and performance. Elevating tires off concrete, using covers to shield from elements, and organizing with racks or stands all contribute to preserving tire integrity during storage, ensuring they’re in optimal condition when it’s time for use.

DIY Alternatives and Tips

Using Cardboard

Utilizing cardboard offers a makeshift barrier:

  1. Rubber Protection: Placing cardboard beneath tires helps create a buffer against direct contact with surfaces, preventing potential flat spotting and moisture absorption.
  2. Limited Effectiveness: While better than direct contact, cardboard might not offer as much protection as elevated wooden boards or specialized storage accessories.

Rotation and Inspection

Regular checks and rotations are crucial:

  1. Even Wear: Rotate tires periodically to prevent flat spotting and ensure even weight distribution.
  2. Damage Inspection: Regularly inspect tires for any signs of damage, cracks, or uneven wear, addressing issues promptly to maintain tire health.

Precautions and Best Practices

Cleaning and Drying

Clean and dry tires before storage to prevent issues:

  1. Mold Prevention: Removing dirt and moisture minimizes the risk of mold or mildew growth during storage.
  2. Preserving Integrity: Clean tires also allow for easier inspection and help maintain their integrity while in storage.

Ideal Storage Conditions

Optimal conditions ensure tire longevity:

  1. Cool and Dry Environment: Store tires in a cool, dry area to prevent rubber degradation or moisture-related damage.
  2. Avoid Sunlight Exposure: Keep tires away from direct sunlight, as UV rays can accelerate rubber aging and cause damage.

Adhering to these DIY tips, precautions, and best practices significantly extends tire life during storage. While cardboard offers some protection, rotating tires, inspecting for damage, cleaning and drying, and storing in optimal conditions play pivotal roles in preserving tire quality for longer periods.

FAQs

Can I Store Tires on Cardboard to Protect Them?

While using cardboard as a barrier between tires and the storage surface can offer some protection against flat spotting and moisture absorption, it might not be as effective as elevated wooden boards or specialized storage accessories.

For optimal tire preservation, it’s advisable to elevate tires off the ground using boards or pallets to prevent direct contact with surfaces and promote proper air circulation.

How Often Should I Rotate Tires During Storage?

Rotating tires every few months (around every 3-6 months) during storage is beneficial to prevent flat spotting and ensure even weight distribution. This rotation helps mitigate the risk of tires developing permanent flat spots due to prolonged storage in one position.

Additionally, inspecting tires regularly for signs of damage, wear, or unevenness is crucial to address any issues promptly.

Is it Necessary to Clean Tires Before Storing Them?

Cleaning and thoroughly drying tires before storage is highly recommended. Removing dirt, debris, and moisture helps prevent mold or mildew growth, preserving tire integrity during storage.

Additionally, clean tires facilitate easier inspections and enable you to identify any potential damage or wear before storing them, ensuring they remain in good condition throughout the storage period.

Wrap Up

In the realm of tire care, thoughtful storage practices are vital for prolonging tire life and maintaining performance. Elevating tires off concrete, using covers, and rotating them periodically are proactive measures. DIY solutions like cardboard barriers offer some protection, yet specialized storage accessories and adherence to best practices yield optimal results.

Cleaning, inspecting for damage, and storing in ideal conditions ensure tires emerge from storage in top form, ready to hit the road with longevity and reliability intact.

How to Diagnose and Fix Electrical Issues


Within the intricate anatomy of a vehicle, electrical systems stand as the nerve center, orchestrating operations from lights to engine functions. Yet, when glitches occur in this labyrinth of wires and connections, the repercussions can disrupt the entire vehicle’s performance. In this comprehensive guide, we’ll delve into the pivotal role played by car electrical systems and the repercussions of malfunctions on overall performance.

Furthermore, we’ll embark on a journey to demystify the process of diagnosing and fixing these issues, emphasizing the importance of a systematic approach and a foundational understanding. Join us as we illuminate the path to troubleshooting and resolving car electrical issues, ensuring a smoother ride down the road.

How to Diagnose and Fix car Electrical Issues
Credit: gwrench.com

Initial Assessment

Identifying Symptoms

Recognizing common signs of electrical problems is key:

  1. Flickering Lights: Lights dimming or flickering unexpectedly while driving.
  2. Non-Responsive Electronics: Inoperative power windows, radio, or erratic behavior of dashboard indicators.
  3. Irregular Engine Starting: Difficulty starting the engine, slow cranking, or the engine not turning over.

Gather Information

Documenting details aids in diagnosis:

  1. Symptom Description: Note the specific symptoms, when they occur, and under what conditions.
  2. Relevant Occurrences: Record any recent modifications or incidents related to the vehicle’s electrical system.

Preliminary Checks

Battery Inspection

A thorough battery check is crucial:

  1. Corrosion and Connections: Inspect the battery terminals for corrosion or loose connections that may hinder electrical flow.
  2. Voltage Testing: Use a multimeter to measure voltage; a fully charged battery should read around 12.6 volts.

Fuses and Relays

Examining these components helps identify issues:

  1. Visual Inspection: Visually inspect fuses for signs of burning or damage.
  2. Testing: Use a multimeter to test for continuity across the fuse or relay, ensuring they’re not burnt out.

Completing these initial assessments and preliminary checks allows for a systematic approach to diagnosing electrical issues. Documenting symptoms and conducting thorough inspections of key components like the battery, fuses, and relays can often pinpoint the root cause, aiding in effective troubleshooting and resolution.

Diagnostic Tools and Techniques

diagnostic car tools and techniques
Credit: napacanada.com

Multimeter Usage

Utilizing a multimeter efficiently aids in diagnosing electrical issues:

  1. Circuit Testing: Test circuits for continuity to ensure electricity flows correctly through components.
  2. Voltage Measurement: Measure voltage across components to identify irregularities or voltage drops.
  3. Identifying Faults: Use different settings on the multimeter to diagnose faults like short circuits or open circuits.

OBD-II Scanner

The OBD-II scanner is indispensable for modern vehicles:

  1. Error Code Retrieval: Retrieve error codes stored in the vehicle’s onboard computer system to pinpoint specific issues.
  2. Diagnostic Information: Interpret error codes to understand the root cause of electrical problems, including engine, transmission, or other system malfunctions.

Systematic Troubleshooting

Wiring Inspection

Thoroughly inspecting wiring harnesses is crucial:

  1. Visual Examination: Look for signs of wear, fraying, damage, or corrosion on wires and connections.
  2. Testing Continuity: Use a multimeter to test for continuity along wires to identify breaks or faulty connections.

Component Isolation

Isolating components aids in pinpointing problems:

  1. Disconnect Components: Systematically disconnect electrical components one by one to determine if any specific part causes the issue.
  2. Testing Separately: Test each isolated component individually to confirm if it’s the source of the problem.

These diagnostic tools and systematic troubleshooting techniques empower mechanics and DIY enthusiasts to methodically diagnose electrical issues. From utilizing multimeters for circuit testing to leveraging OBD-II scanners for error code retrieval, these methods streamline the identification and resolution of electrical problems in vehicles.

Repair and Resolution

Component Replacement

Replacing faulty components involves careful steps:

  1. Safety Precautions: Disconnect the battery to avoid electrical hazards. Use proper tools and follow manufacturer guidelines.
  2. Replacement Steps: Remove and replace the faulty component, ensuring correct installation and secure connections.
  3. Testing: After replacement, perform tests to ensure the new component functions properly.

Wiring Repair

Repairing damaged wiring requires attention to detail:

  1. Identify Damage: Locate damaged sections and cut out affected areas.
  2. Insulation and Connections: Strip wire ends, use appropriate connectors, and insulate connections properly to prevent future issues.
  3. Testing: Verify repaired wiring for continuity and proper functionality.

Final Checks and Testing

Reassembly

Reassembly is crucial for proper functioning:

  1. Secure Connections: Double-check all connections, ensuring components are correctly reassembled and securely fastened.
  2. Inspect Work: Verify no tools or loose parts are left behind and that everything is properly reinstalled.

Functional Test

Conduct a final test to ensure resolution:

  1. System Check: Turn on the vehicle and test the repaired electrical system, ensuring all functions work as intended.
  2. Test Drive: If applicable, take a short test drive to validate that the repairs have effectively resolved the issue.

Completing repairs with meticulousness and attention to safety protocols is key to ensuring a successful resolution of electrical issues. Thoroughly testing and conducting final checks not only guarantee the problem’s resolution but also ensure the vehicle’s safe and reliable operation.

FAQs

Why Is Using a Multimeter Important for Diagnosing Electrical Problems?

A multimeter is a versatile tool crucial for diagnosing electrical issues in vehicles. It allows users to test circuits, measure voltage, and identify faults like short circuits or open circuits. By checking continuity, voltage, and resistance, a multimeter helps pinpoint problems within the electrical system, allowing for accurate troubleshooting.

Its versatility and ability to test various electrical aspects make it an indispensable tool for diagnosing and resolving vehicle electrical issues.

What Precautions Should I Take When Repairing Electrical Components in a Vehicle?

Safety is paramount when working on vehicle electrical systems. Before starting any repairs, it’s crucial to disconnect the vehicle’s battery to prevent electrical hazards. Additionally, use proper tools and follow manufacturer guidelines and service manuals to ensure correct procedures.

Avoid working on electrical components in wet or damp conditions, and if uncertain, consider seeking professional assistance to ensure repairs are performed safely and effectively, minimizing the risk of accidents or damage to the vehicle.

Wrap Up

In tackling electrical issues within a vehicle, a systematic approach, proper tools, and safety measures are essential. From diagnosing symptoms with multimeters to utilizing OBD-II scanners, these steps aid in precise identification. Repairing and reassembling components, while ensuring secure connections and proper insulation, completes the process. Remember, safety precautions and meticulous testing validate the resolution.

By following these steps diligently, drivers can confidently navigate the road, knowing their vehicle’s electrical systems have been methodically diagnosed, repaired, and thoroughly checked for optimal performance and safety.

How to Perform a Safety Check Before a Road Trip


Embarking on a road trip is an adventure, but ensuring vehicle safety beforehand is paramount. The significance of pre-road trip safety checks extends beyond preventing breakdowns—it’s about ensuring a journey free of unexpected hassles. In this comprehensive guide, we’ll delve into the essentiality of these checks, focusing on the peace of mind they provide and the safety they guarantee.

As we navigate the road ahead, we’ll outline the key components and critical areas that demand your attention before setting off on your road trip. Join us in mastering the art of pre-trip safety checks, ensuring your adventure begins with confidence and security.

How to Perform a Safety Check Before a Road Trip
Credit: roadsafetyuae.com

External Inspection

Tires

Checking tire health involves multiple steps:

  1. Tire Pressure: Use a reliable gauge to ensure tires are inflated to the manufacturer’s recommended PSI, enhancing fuel efficiency and traction.
  2. Tread Depth: Measure tread depth to confirm it meets legal requirements and ensures proper grip on roads, especially in wet conditions.
  3. Overall Condition: Inspect for cuts, bulges, or uneven wear, addressing any issues promptly to maintain safety and extend tire life.

Lights

Inspecting exterior lights is crucial:

  1. Headlights: Ensure both high and low beams work effectively for optimal visibility during night drives.
  2. Taillights and Brake Lights: Check these lights for proper functionality to alert other drivers of braking.
  3. Turn Signals: Confirm signals function correctly for safe lane changes and turns, improving overall road safety.

Under-the-Hood Inspection

Under-the-Hood Inspection
Credit: carparts.com

Fluid Levels

Checking fluid levels keeps your vehicle running smoothly:

  1. Engine Oil: Verify oil levels and quality, scheduling regular changes as recommended by the manufacturer.
  2. Coolant: Ensure the coolant level is adequate to prevent engine overheating.
  3. Brake, Power Steering, and Windshield Washer Fluid: Check and top up these fluids for optimal brake performance, steering control, and clear visibility.

Belts and Hoses

Inspect belts and hoses for potential issues:

  1. Belts: Check for signs of wear, fraying, or cracks in the serpentine and timing belts that could affect engine operation.
  2. Hoses: Look for leaks, soft spots, or bulges in radiator and heater hoses, as they play crucial roles in maintaining proper engine temperature.

Regular inspections and maintenance of these external and under-the-hood components are essential for a safe and reliable driving experience. Identifying and addressing issues early can prevent more significant problems down the road, ensuring your vehicle operates at its best.

Mechanical Components

Brakes

Maintaining functional brakes is vital for safety:

  1. Brake Pads and Rotors: Inspect brake pad thickness and rotor condition for even wear. Replace worn pads and address any rotor damage to ensure efficient braking.
  2. Brake Fluid: Check brake fluid levels and quality regularly, as low levels or contaminated fluid can compromise braking performance.

Suspension and Steering

Inspecting these components ensures a smooth and safe ride:

  1. Shocks and Struts: Look for signs of leakage, uneven wear, or excessive bouncing, indicating potential issues with these components.
  2. Steering: Check for excessive play, unusual noises, or difficulty in steering, which could indicate problems with the steering system.

Interior and Emergency Equipment

Seatbelts and Airbags

Safety features that must be in top condition:

  1. Seatbelts: Ensure seatbelts retract smoothly and latch securely for every passenger, as they are primary safety restraints.
  2. Airbags: Confirm the airbag warning light functions correctly and address any issues immediately to ensure proper deployment in case of a collision.

Emergency Kit

Carrying essential items can be a lifesaver in emergencies:

  1. Spare Tire and Tools: Ensure your vehicle has a functional spare tire, along with tools necessary for changing a tire.
  2. Flashlight and First Aid Kit: Carry a flashlight with spare batteries and a basic first aid kit for unforeseen situations.
  3. Roadside Assistance Contact: Have contact information for roadside assistance readily available for emergencies beyond your control.

Regularly inspecting these mechanical components and ensuring the functionality of safety features can significantly reduce the risk of accidents or breakdowns. Additionally, having an emergency kit on hand prepares you for unforeseen circumstances, providing peace of mind during travels.

Test Drive and Final Checks

Test Drive

Take a short test drive to validate the vehicle’s performance:

  1. Handling: Test steering responsiveness, ensuring it feels precise and without unusual noises or vibrations.
  2. Braking: Confirm the brakes are responsive and without any sponginess or grinding noises.
  3. Suspension: Assess the ride quality, checking for any unusual bouncing, clunks, or rattles.

Final Checks

Before hitting the road, go through these key final steps:

  1. External Components: Recheck tire pressure, ensuring optimal inflation, and inspect lights to guarantee they function correctly.
  2. Under-the-Hood: Verify fluid levels, including engine oil, coolant, brake fluid, and windshield washer fluid.
  3. Safety Features: Ensure seatbelts retract and latch properly, and check the airbag warning light to confirm functionality.
  4. Emergency Kit: Confirm the presence and accessibility of the emergency kit, spare tire, tools, flashlight, and first aid kit.

Emphasize the importance of this final walkthrough to validate that all systems are functioning as expected. Address any concerns or issues identified during the test drive or final checks before embarking on your journey. These last-minute verifications can prevent unexpected problems and ensure a safe and smooth driving experience.

FAQs

How Long Should a Test Drive Be to Assess a Vehicle’s Condition?

The duration of a test drive can vary but aiming for at least 15-20 minutes is ideal. This duration allows enough time to evaluate various aspects such as steering responsiveness, braking, suspension, and overall comfort. It’s beneficial to include diverse road conditions like highways, city streets, and possibly some rough patches to get a comprehensive feel for the vehicle’s performance.

However, the key is to focus on quality rather than strictly adhering to a specific time frame, ensuring you’re comfortable with the vehicle’s behavior in different scenarios.

Why is a Final Walkthrough Important Before Hitting the Road?

A final walkthrough serves as a crucial safety checkpoint. It ensures that all essential components, from tire pressure and fluid levels to safety features like seatbelts and lights, are in optimal condition. Verifying these aspects before driving helps prevent potential breakdowns, ensures proper functioning of safety features, and allows for immediate resolution of any identified issues.

This last-minute check offers peace of mind and helps guarantee a safe and trouble-free journey by addressing any concerns before hitting the road.

Conclusion

In essence, conducting thorough inspections, test-driving, and final checks before hitting the road serve as a safeguard for both the vehicle’s performance and the driver’s safety. These steps, from scrutinizing mechanical components to ensuring safety features and emergency kits are in top condition, empower drivers to embark confidently on their journeys.

By dedicating time to these checks, drivers not only ensure a smooth driving experience but also proactively mitigate potential risks, fostering a safer and more enjoyable travel experience for all.

How to Choose the Right Tires for Your Car?


Tires aren’t just rubber and tread; they’re the unsung heroes of your vehicle’s performance and safety. In this guide, we’ll unravel the critical role that tires play in the driving experience. Beyond being the mere connection to the road, tires impact handling, traction, and overall vehicle dynamics. As we embark on this journey, we’ll explore the essential factors pivotal in selecting the perfect set of tires.

From understanding sizes and types to navigating diverse driving conditions, choosing the right tires isn’t just about rubber—it’s about optimizing your car’s performance and ensuring a safer, smoother ride. Join us as we navigate the intricate world of tire selection, ensuring your vehicle rolls on the right wheels for every journey ahead.

How to Choose the Right Tires for Your Car
Credit: clickitwheels.com

Understanding Tire Specifications

Tire Size and Dimensions

The numbers and letters on a tire’s sidewall contain essential information about its size and dimensions. Let’s break down a typical tire size code like “P215/65R15” to understand its components:

  1. P – Indicates the tire type. In this case, it stands for “passenger vehicle.”
  2. 215 – Represents the tire width in millimeters. This is the measurement from one sidewall to the other, indicating the tire’s width when properly inflated but not loaded.
  3. 65 – Denotes the aspect ratio, which is the ratio of the tire’s sidewall height to its width. In this example, the sidewall height is 65% of the tire’s width.
  4. R – Signifies the tire construction type. “R” stands for radial construction, the most common type in modern tires.
  5. 15 – Indicates the diameter of the wheel or rim in inches that the tire is designed to fit.

So, for “P215/65R15,” you have a passenger tire that is 215 millimeters wide with a sidewall that is 65% of the width, designed to fit a 15-inch rim.

Load Index and Speed Rating

Load Index and Speed Rating are crucial factors in determining a tire’s performance capabilities.

  1. Load Index: This number corresponds to the tire’s load-carrying capacity. It indicates the maximum weight a tire can support when properly inflated. For example, a tire with a load index of 95 can carry a maximum load of 1521 pounds.
  2. Speed Rating: This letter indicates the maximum speed capability of the tire when it’s properly inflated and under the specified load. Speed ratings range from “A” (the lowest) to “Y” (the highest). For instance, a tire with a speed rating of “H” can sustain speeds up to 130 mph.

These ratings are essential for safety and ensuring that your vehicle’s tires are suitable for the intended load and speed requirements. Matching the appropriate ratings to your vehicle’s specifications is crucial for optimal performance and safety on the road.

Types of Tires

types of tires

All-Season Tires

All-season tires are designed to provide a balance of performance characteristics suitable for a wide range of weather conditions and driving styles. They offer:

  1. Versatility: All-season tires are engineered to perform adequately in dry, wet, and light winter conditions. They aim to provide a smooth, quiet ride with good traction in various temperatures.
  2. Tread Design: Their tread pattern is optimized for a mix of conditions, featuring moderate tread depths and patterns that facilitate efficient water evacuation for improved grip on wet roads. They typically have a combination of biting edges for light snow traction.
  3. Year-Round Use: These tires are popular for drivers who don’t experience extreme weather conditions year-round. They offer convenience by eliminating the need to change tires with the seasons.

While they provide decent performance in various conditions, all-season tires may not excel in extreme winter or high-performance driving situations.

Summer vs. Winter Tires

Summer Tires

  1. Warm Weather Performance: Summer tires are optimized for warm weather conditions. They feature a tread compound that remains flexible in hot temperatures, providing enhanced grip and responsiveness on dry and wet roads.
  2. Tread Design: Their tread patterns focus on maximizing traction on dry surfaces, with fewer grooves for water evacuation compared to all-season or winter tires. This design boosts handling and cornering abilities in warm conditions.

Winter Tires

  1. Cold Weather Performance: Winter tires are specifically engineered for cold temperatures, ice, snow, and slush.
  2. Tread Design: Their tread compounds remain pliable in low temperatures, retaining traction even in icy conditions. The tread patterns have more sipes (thin slits) and deeper grooves to bite into snow and improve grip on slippery surfaces.

Choosing between summer and winter tires depends on the climate you live in and your driving habits. Winter tires offer superior performance in cold, snowy conditions, while summer tires excel in warm weather, providing better traction and handling on dry and wet roads. For regions with extreme weather, using dedicated summer and winter tires for their respective seasons is recommended for optimal safety and performance.

Specialized Tires for Specific Needs

High-Performance Tires

High-performance tires are engineered to offer superior handling, traction, and speed capabilities, primarily targeting sports cars or enthusiasts seeking enhanced performance. Key features include:

  1. Enhanced Grip: These tires use advanced tread compounds that provide increased grip on both dry and wet surfaces. The rubber compounds are formulated for better traction, enabling improved acceleration, braking, and cornering abilities.
  2. Stiffer Sidewalls: High-performance tires often have stiffer sidewalls, enhancing responsiveness and stability during high-speed maneuvers.
  3. Wider Tread Patterns: The wider tread patterns maximize contact with the road, optimizing grip and handling.

These tires offer exceptional performance but might have a shorter lifespan due to their softer compounds and aggressive tread patterns. They’re best suited for performance-oriented driving rather than longevity.

Off-Road and All-Terrain Tires

Off-road and all-terrain tires are designed for vehicles used in rugged terrains and off-road adventures. Their features include:

  1. Aggressive Tread Patterns: These tires have deep, aggressive tread designs with larger voids between tread blocks. This allows for better traction in mud, gravel, dirt, and rocky surfaces.
  2. Reinforced Sidewalls: They often come with reinforced sidewalls to withstand impacts from rocks and rough terrain, reducing the risk of punctures.
  3. Durable Construction: Off-road tires are built with durable compounds and materials to withstand harsh conditions while providing traction and stability.

These tires sacrifice some on-road comfort and noise for their off-road capabilities and are suitable for drivers who frequently navigate challenging terrains.

Considerations for Driving Conditions

Wet and Dry Handling

Tire tread patterns and compounds play a crucial role in performance under varying conditions:

  1. Wet Conditions: Tires optimized for wet conditions have deeper grooves and channels to disperse water and reduce the risk of hydroplaning. The tread compounds are designed to maintain grip even on wet surfaces.
  2. Dry Conditions: Tires for dry conditions often have shallower treads and a firmer rubber compound, maximizing contact with the road for better traction and handling.

Noise and Comfort

Tire noise levels can impact comfort, especially during longer drives. Tires with aggressive tread patterns or specific designs for performance might generate more noise than standard or touring tires.

However, advancements in tire technology aim to minimize noise while maintaining performance characteristics, offering a balance between comfort and capability. Touring tires, for instance, are designed to prioritize comfort and low noise levels for extended drives.

Cost Considerations

Tire prices vary based on several factors, including:

  1. Type of Tire: Different tire types (all-season, high-performance, off-road, etc.) come with varying price ranges. High-performance or specialized tires often cost more due to their advanced technology and materials.
  2. Brand: Well-known brands or premium tire manufacturers usually command higher prices due to their reputation, quality, and often enhanced features or warranties.
  3. Quality and Features: Tires with advanced features, better traction, longer tread warranties, or specific performance enhancements might have higher price tags.

Balancing budget and quality involves considering factors like expected performance, longevity, driving conditions, and the specific needs of your vehicle. Opting for mid-range tires from reputable brands can often strike a good balance between cost and quality, providing decent performance and durability without breaking the bank.

Budget and Longevity

Longevity and Durability

The lifespan of tires depends on various factors:

  1. Tire Type: Different types of tires have varying lifespans. For instance, high-performance tires might wear out faster due to their softer compounds optimized for grip.
  2. Maintenance: Proper tire maintenance, including regular rotations, alignments, and maintaining proper tire pressure, significantly impacts longevity. Neglecting these aspects can lead to uneven wear and shorter tire life.
  3. Driving Habits: Aggressive driving, frequent high-speed maneuvers, or driving on rough roads can accelerate tire wear.
  4. Treadwear Warranty: Some manufacturers offer treadwear warranties. However, these warranties might not always reflect real-world conditions and might have specific terms and conditions.

Ensuring proper tire care, following recommended maintenance schedules, and driving responsibly can help maximize the lifespan of your tires. Regular inspections for wear and tear can also identify potential issues early, allowing for timely replacements and ensuring safety on the road.

FAQs

How Often Should I Rotate My Tires?

Rotating your tires is crucial for even tread wear and maximizing their lifespan. As a general rule of thumb, it’s recommended to rotate your tires every 6,000 to 8,000 miles, or as advised by your vehicle’s manufacturer. This routine maintenance practice helps distribute wear more evenly among all tires, extending their longevity and ensuring consistent performance.

If your vehicle has different tire sizes or types on the front and rear axles, rotating them becomes even more critical to maintain balanced traction and handling.

What’s the Best Way to Check Tire Pressure?

Monitoring tire pressure is essential for safety, fuel efficiency, and tire longevity. To check tire pressure accurately, follow these steps:

  1. Use a reliable tire pressure gauge. Digital gauges tend to be more accurate than analog ones.
  2. Check tire pressure when the tires are cold, as driving heats them, leading to inaccurate readings.
  3. Locate the recommended tire pressure for your vehicle (usually found in the owner’s manual or on a sticker inside the driver’s side door jamb).
  4. Unscrew the valve cap and firmly press the gauge onto the valve stem to get a reading.
  5. Compare the measured pressure to the recommended pressure. If it’s low, inflate the tire to the proper PSI using an air compressor. If it’s high, release air until it reaches the recommended level.
  6. Repeat the process for all tires, including the spare, and replace the valve caps securely.

Regularly checking and maintaining proper tire pressure ensures optimal performance, safety, and extends the life of your tires.

Wrap Up


Understanding tire specifications and choosing the right type can significantly impact your driving experience. From all-season versatility to specialized high-performance or off-road capabilities, each tire serves a unique purpose. Balancing budget with quality is essential, as is proper maintenance for longevity. Remember, regular rotations, proper inflation, and monitoring tread wear are key.

By grasping these nuances and considering your driving habits and conditions, you can optimize tire performance, safety, and durability for smoother journeys ahead.

How to Perform DIY Bodywork?


DIY bodywork isn’t just about fixing dents and scratches; it’s an art, a skill, and a journey toward both savings and empowerment. In this comprehensive guide, we’ll delve into the realm of DIY bodywork—defining its scope and highlighting the advantages it offers. Beyond the monetary benefits, it’s an opportunity to embrace new skills and restore your vehicle’s appearance.

However, safety isn’t an option; it’s a priority. We’ll emphasize the critical role of safety measures and protective gear, ensuring that your DIY ventures are not just successful but also secure. Join us as we embark on a journey of DIY bodywork—a fusion of creativity, skill-building, and car care.

How to Perform DIY Bodywork
Credit: axleaddict.com

Assessing Damage and Preparation

Evaluating the Damage

  1. Minor Dents:
    • Assess visually and tactilely for small depressions caused by low-impact collisions.
    • Look for door dings, divots, or slight depressions on the body.
    • Use light reflection or touch to detect these imperfections.
  2. Scratches:
    • Identify superficial marks on the paint that haven’t penetrated the metal.
    • Varying in depth and width, scratches might be thin or wider and deeper.
    • Shine light at different angles or feel the surface to determine depth.
  3. Rust:
    • Look for reddish-brown patches or spots indicating corrosion.
    • Assess the depth by gently rubbing the rust; superficial rust might come off easily.
    • Differentiate between surface-level rust affecting paint and deeper corrosion affecting the metal.

Necessary Tools and Materials

  1. For Minor Dents:
    • Dent Puller or PDR tools
    • Heat gun (for PDR)
    • Body filler and putty knife
    • Sandpaper of varying grits
    • Primer, paint, and clear coat
  2. For Scratches:
    • Fine-grit sandpaper
    • Touch-up paint or scratch repair kit
    • Clear coat for finishing
  3. For Rust:
    • Rust converter or remover
    • Sandpaper or abrasive pad
    • Primer and matching paint

Repairing Minor Dents and Scratches

Repairing Minor Dents and Scratches
Credit: theaa.com

Filling Scratches

  1. Prepare the Surface:
    • Clean the area thoroughly.
    • Use fine-grit sandpaper to gently sand the scratch.
  2. Apply Filler:
    • Fill the scratch with appropriate filler or touch-up paint.
    • Allow it to dry as per product instructions.
  3. Sanding:
    • Sand the filled area gently to smoothen it, using progressively finer grits.
    • Ensure a level surface before applying clear coat for finishing.

Dent Removal Techniques

  1. Paintless Dent Repair (PDR):
    • Use PDR tools to massage and reshape the dent from the inside.
    • Apply heat using a heat gun to aid in reshaping the metal.
  2. Dent Pulling Tools:
    • Attach a dent-pulling tool and gradually pull the dent outward to reshape the metal.
    • Use caution to avoid further damage.

These methods require patience and precision. If unsure, seek guidance from professionals or tutorials specific to your vehicle’s make and model.

Dealing with Rust and Corrosion

Identifying Rust Areas

  1. Rust-Prone Areas:
    • Wheel wells, door edges, undercarriage, and areas around trim or chrome are prone to rust due to moisture exposure.
    • Inspect hidden areas, like the underside of the vehicle and inside wheel arches.
  2. Addressing Surface Rust:
    • Use a wire brush or sandpaper to remove surface rust.
    • Apply a rust converter to neutralize and prevent further corrosion.
    • Regularly inspect and treat these areas to avoid rust progression.

Rust Removal Process

  1. Sanding:
    • Use coarse sandpaper to remove loose rust and expose the metal.
    • Progress to finer grits for a smoother surface.
  2. Applying Rust Converter:
    • Follow the instructions on the rust converter product.
    • Typically, it involves applying the converter to the affected area and allowing it to react with the rust, forming a protective layer.
  3. Repainting:
    • Apply primer to the treated area to prepare it for paint adherence.
    • Match the paint color and apply thin, even coats, allowing each layer to dry before applying the next.

Repainting and Refinishing

Preparing Surfaces

  1. Cleaning:
    • Thoroughly clean the surface to remove dirt, grease, and old paint residue.
    • Use a mild detergent or specially formulated cleaner.
  2. Sanding and Masking:
    • Sand the surface to create a smooth base for paint application.
    • Use masking tape and paper to protect surrounding areas not intended for painting.

Painting Techniques

  1. Spray Painting:
    • Use a spray gun for larger areas or comprehensive paint jobs.
    • Apply thin, even coats to prevent dripping or uneven coverage.
  2. Touch-Up Paint:
    • For minor areas, use touch-up paint with a small brush or pen applicator.
    • Apply thin layers and allow drying time between coats.

Tips for Professional Finish

  • Work in a dust-free environment.
  • Follow recommended drying times between coats.
  • Practice painting techniques on a test surface to get comfortable before working on the actual area.

Always prioritize safety when handling chemicals and ensure proper ventilation during paint application. Following manufacturer guidelines for products and equipment usage is crucial for effective and safe repairs.

FAQs

How can I prevent rust from reoccurring after treating it?

Preventing rust recurrence involves diligent maintenance. After treating rust, ensure regular inspections of susceptible areas. Applying a protective coating, like rust-resistant paint or wax, can act as a barrier against moisture.

Additionally, keeping your vehicle clean, especially during winter or in coastal areas, and promptly addressing scratches or chips on the paint surface can deter rust formation.

Can I fix minor dents and scratches at home without professional help?

Yes, minor dents and scratches can often be repaired at home with the right tools and techniques. For minor scratches, using touch-up paint and following proper sanding and filling processes can yield satisfactory results.

However, for significant dents or if you’re uncertain, seeking professional help ensures precision and prevents further damage.

What’s the best way to achieve a smooth and professional paint finish?

Achieving a professional paint finish requires meticulous preparation. Properly clean and sand the surface, ensuring it’s free from contaminants. Applying thin, even coats of primer and paint, allowing adequate drying time between layers, and using the recommended application techniques, such as spray painting or using touch-up paint, contributes to a smooth, professional finish. Patience and attention to detail are key!

Wrap Up

Repairing minor dents, scratches, and addressing rust on your car’s bodywork not only maintains its aesthetic appeal but also safeguards its structural integrity. By learning to identify and address these issues, you can extend the lifespan of your vehicle while preserving its value.

Remember, thorough assessment is crucial before embarking on any repair. Take time to inspect for hidden damages and use the right tools and materials for each task. While DIY approaches are feasible for minor damages, seeking professional guidance for complex issues ensures precision and prevents further complications.